Descript turns video editing into transcript editing — delete a word from the text, and that moment disappears from the video.
Transcript-based video editing can sound like a gimmick at first — a novelty feature that looks impressive in demos but seems like it might fall apart on a real project. Picture a long interview recording, crammed with filler words, false starts, and a lengthy tangent that has nothing to do with the topic. The traditional workflow means hours of scrubbing through a timeline, clicking, trimming, and nudging clips by frames — a familiar pain for anyone who edits video.
This article contains affiliate links. If you buy through them I may earn a commission at no extra cost to you. All opinions are my own.
In Descript, deleting a paragraph from the transcript moves the audio and video in sync — like editing a Google Doc that happened to have a film crew attached to it. That capability is what makes it more than a gimmick.
Fast forward to today: transcript-based editing has gone from a clever party trick to a genuinely professional workflow, used on everything from YouTube videos to client podcast productions. This guide is a deep dive into the actual workflow, the time-saving moves, the gotchas, and an honest look at what the output quality looks like compared to traditional editing. Let’s get into it.
Contents
What Is Transcript-Based Editing and Why Does It Change Everything?
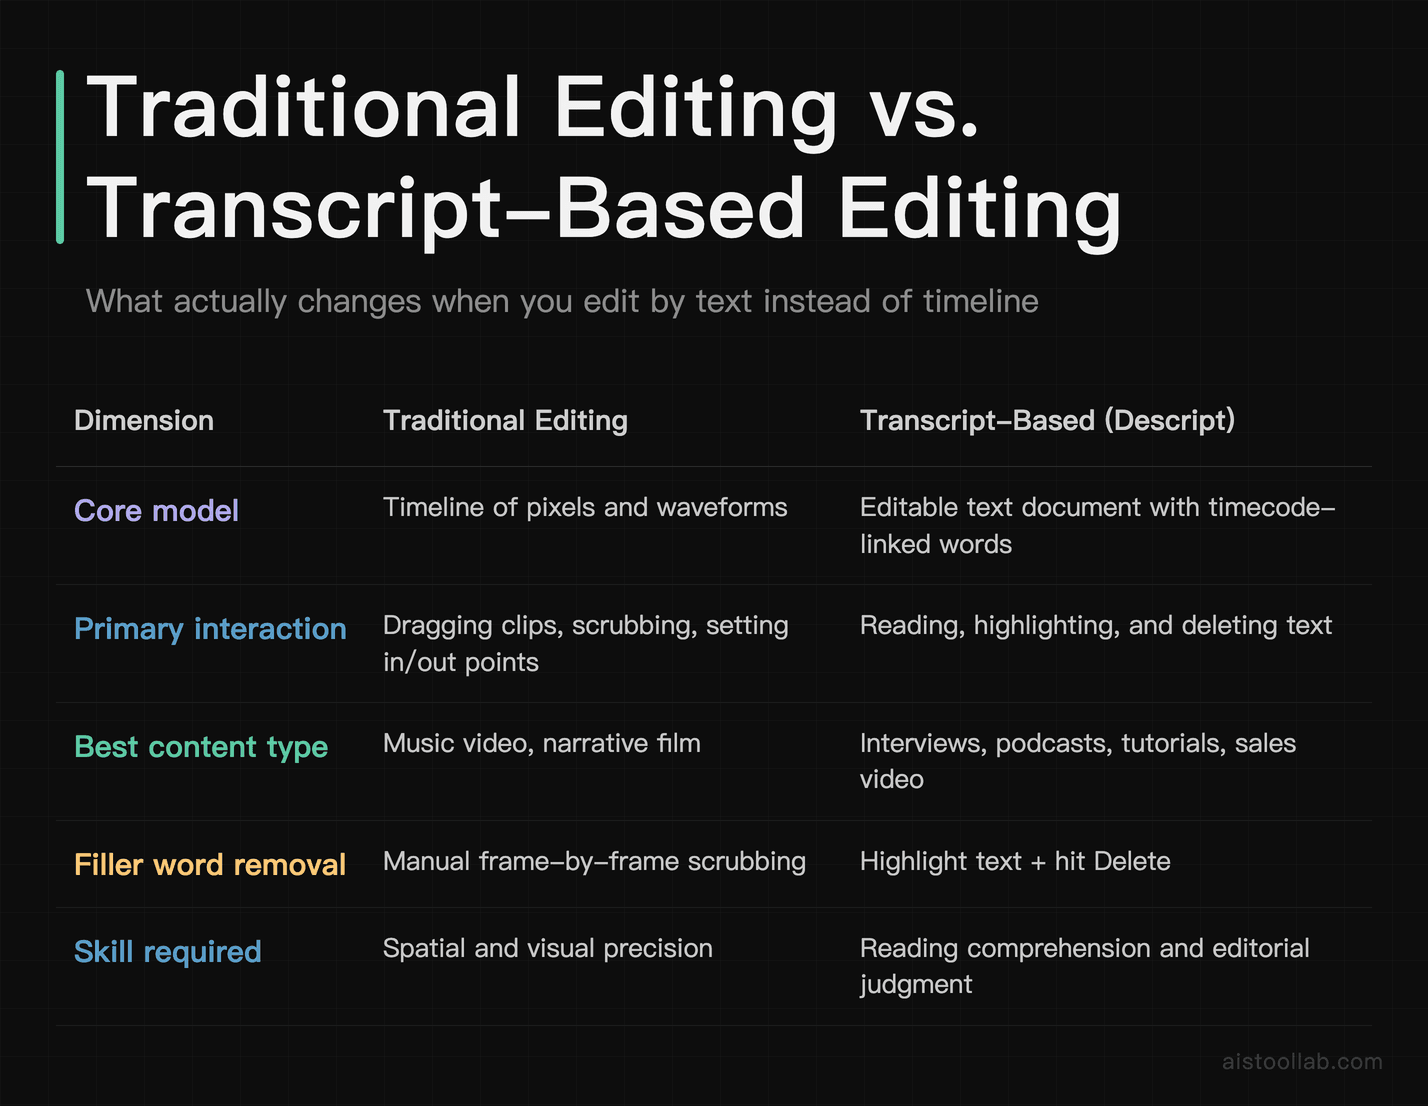
Traditional video editing treats your footage as a timeline of pixels and waveforms. You drag clips around, you set in and out points, you watch the playhead move across a sequence. It’s visual and spatial, which is great when you’re editing a music video or a narrative film. But when your raw material is someone talking — an interview, a podcast, a tutorial, a sales video — you’re essentially doing the same job as a text editor, just with a massively more cumbersome toolset.
Transcript-based editing flips this on its head. Descript transcribes your video automatically using AI speech recognition, then displays that transcription as an editable text document. Every word in the document is linked to its corresponding timecode in the video. When you highlight “um, so I think, you know, the thing is” and hit Delete, Descript removes those exact frames from the video. You’re editing prose, and the timeline takes care of itself.
The practical upshot is significant. Tasks that require spatial precision in traditional editing — cutting out filler words, removing a bad take, rearranging sections — become tasks that require reading comprehension. If you can edit a document, you can edit a video. That’s not marketing copy; that’s genuinely how the workflow is designed to feel.
Prerequisites: What You Need Before You Start
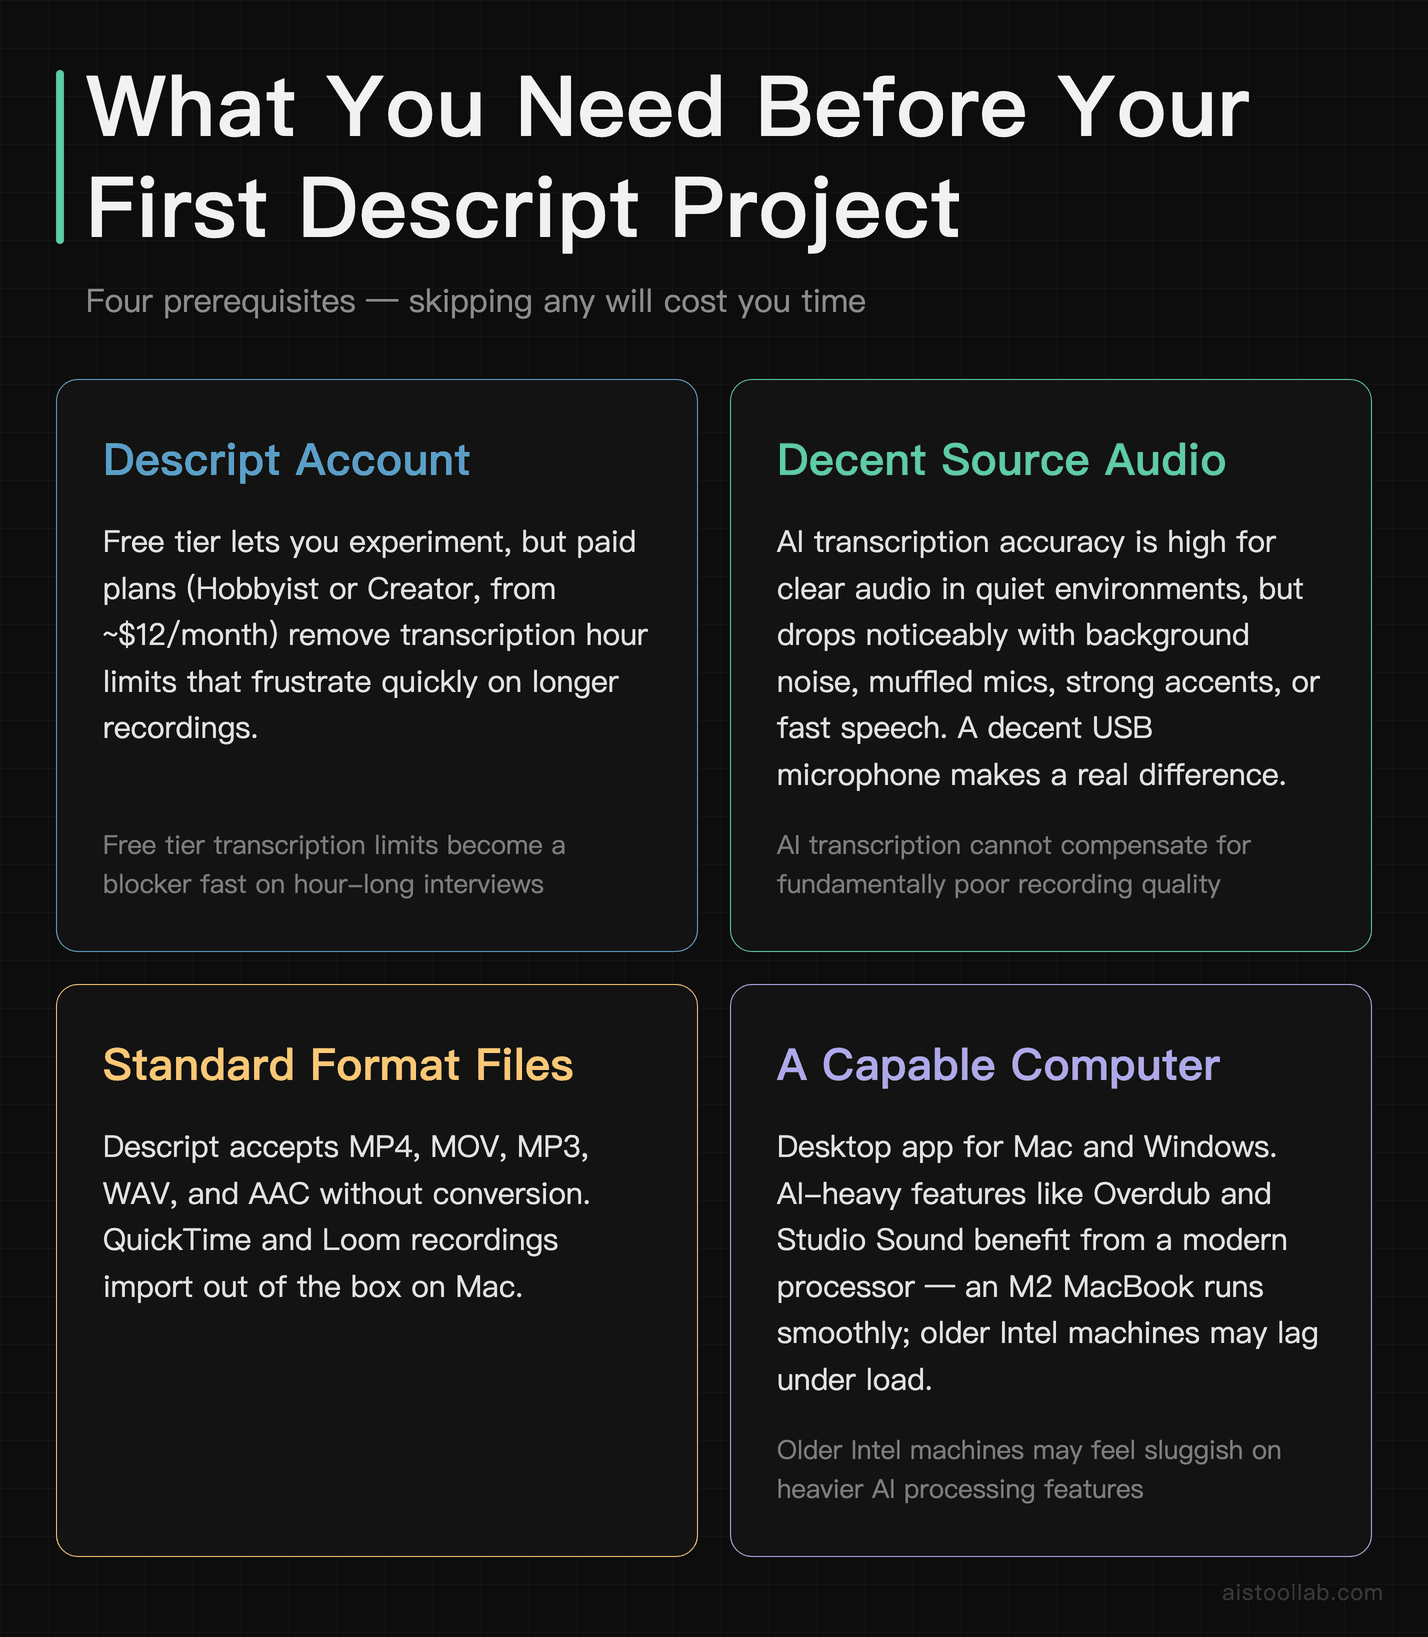
Before walking through the workflow, let’s make sure you’re set up correctly. Rushing into Descript without a few basics in place will cost you time you don’t need to lose.
- A Descript account: The free tier lets you experiment, but for serious editing work you’ll want at least the Hobbyist or Creator plan. Pricing starts around $12/month — less than most streaming services. The free tier has transcription hour limits that will frustrate you quickly on longer projects.
- Decent source audio: Descript’s AI transcription is impressively accurate, but it’s not magic. If your audio is muffled, heavily accented, or full of background noise, expect more cleanup time in the transcript. A decent USB microphone makes a real difference here.
- Video or audio files in standard formats: MP4, MOV, MP3, WAV, AAC — Descript handles them all. If you’re on a Mac recording with QuickTime or Loom, you’re fine out of the box.
- A reasonable computer: Descript is a desktop app (Mac and Windows) with a web component. The heavier AI features like Overdub and Studio Sound benefit from a modern processor. On an M2 MacBook the app runs smoothly; on older Intel machines you may notice some lag during playback of effects-heavy sequences.
One more thing: if you’re new to Descript, spend 20 minutes in a throwaway project first. Just import a video of yourself talking, make a few cuts, try the filler word remover, and export. Get the spatial layout of the interface in your head before you commit a real client project to it.
Use Cases: Who Actually Benefits From This Workflow?
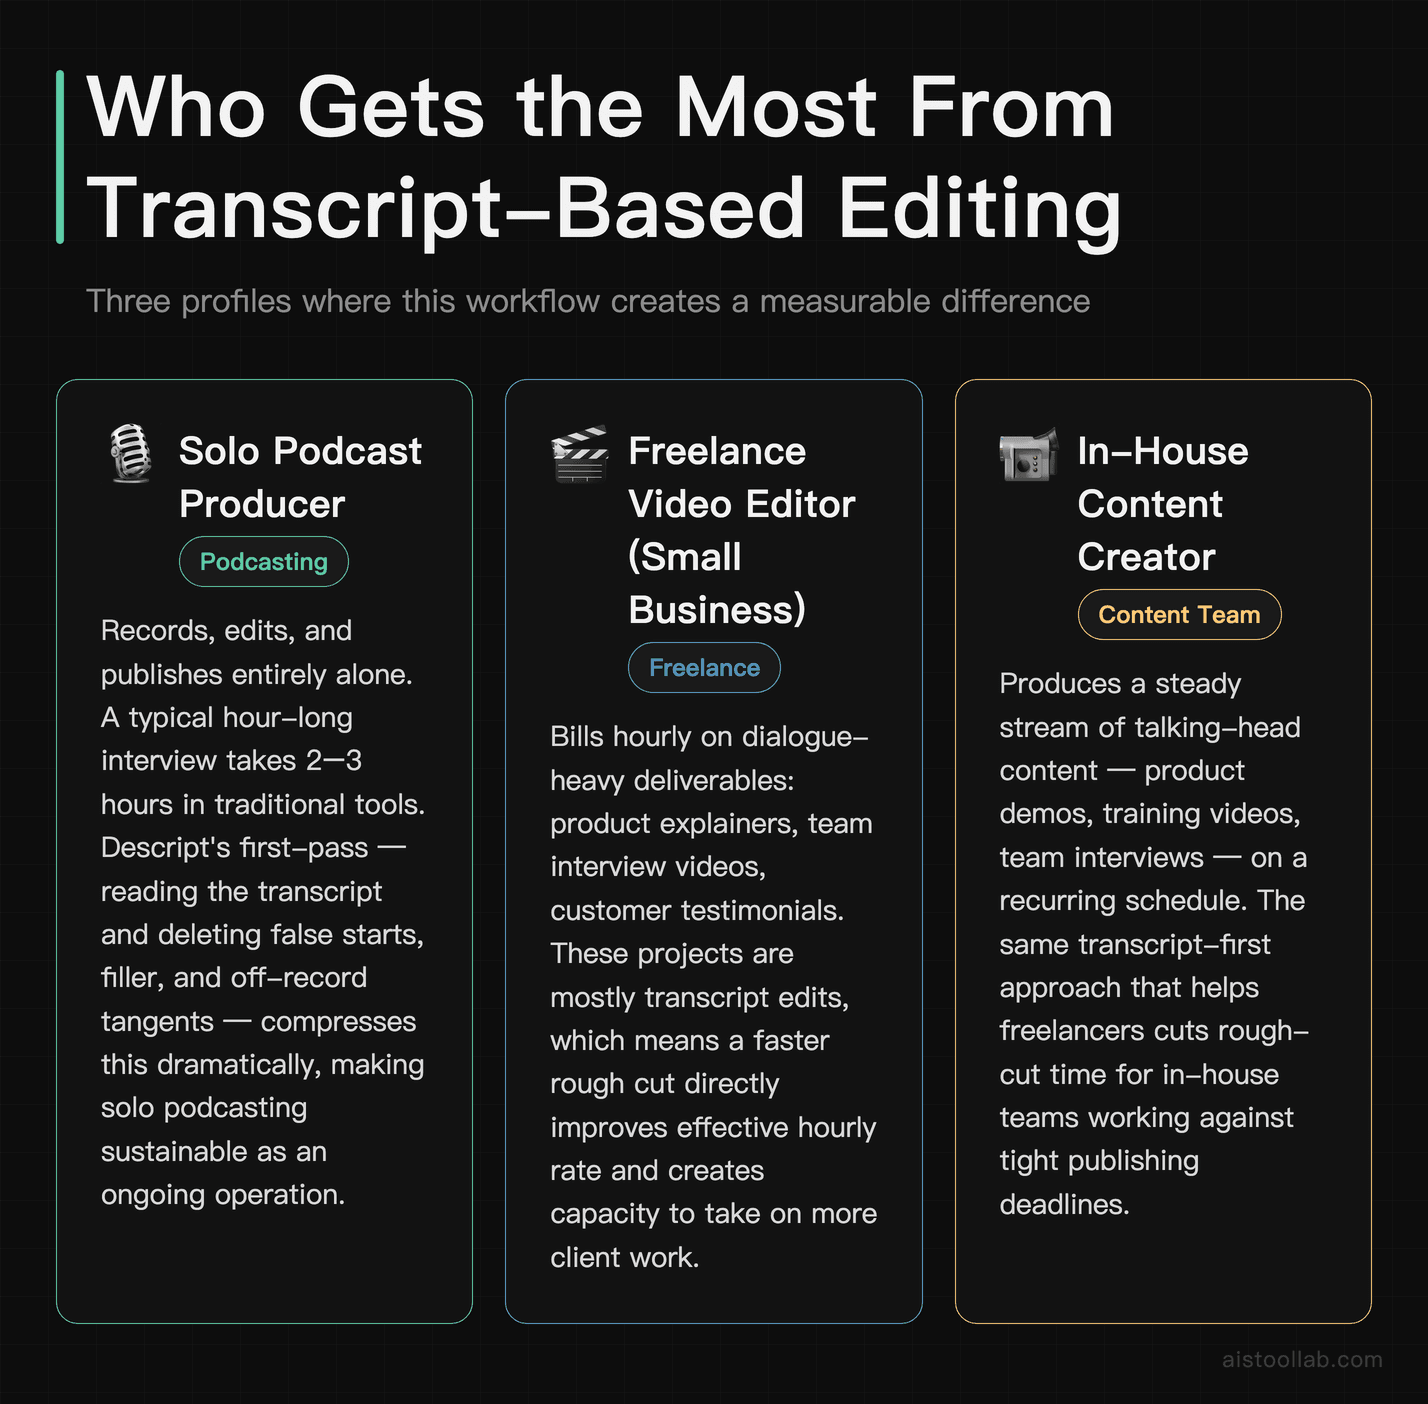
The Solo Podcast Producer
If you’re running a podcast solo — recording, editing, and publishing all by yourself — traditional audio editing in Audacity or Adobe Audition eats your week. A typical hour-long interview might take two to three hours to edit down to a polished 40-minute episode. With Descript’s transcript editing, the first pass becomes reading through your transcript and deleting the obvious junk: false starts, long pauses, the moment your guest said something off-record, that whole five-minute section that went nowhere. Because you’re reading rather than listening, you can do this pass significantly faster. Then you do one listening pass to catch anything that sounds abrupt. It’s a workflow shift that genuinely changes whether podcasting feels sustainable as a solo operation.
The Freelance Video Editor Working for Small Business Clients
A freelance editor billing hourly on talking-head corporate videos — product explainers, team interview videos, customer testimonials — is leaving money on the table with traditional editing. These videos are heavily dialogue-driven, which means the edits are mostly transcript edits. Getting through a rough cut faster means either higher margins or more competitive pricing. Descript also makes client review easier: you can share a link to the project and clients can leave timestamped comments, which cuts down the “can you send me a new export with the change at 4:23?” email chain significantly.
The Content Creator Running a YouTube Channel
YouTube creators who produce talking-to-camera content or interview videos face a particular time crunch: publish consistently or the algorithm stops caring about you. Transcript editing helps on two fronts. First, the editing itself is faster once the workflow clicks. Second, Descript’s filler word and silence removal tools handle a lot of the mechanical cleanup automatically, leaving you to focus on the narrative structure rather than hunting down every “uh” manually. The transcript also doubles as a starting point for your video description, chapters, and even blog repurposing — a point I’ll return to in the workflow section.
The Marketing Team Creating Internal or Customer-Facing Video
A two-person SaaS startup marketing team doesn’t have a dedicated video editor. They have the marketing manager who’s decent in Canva and the growth lead who once exported something from iMovie. Descript is approachable enough for non-editors to produce clean, professional results. The transcript interface removes the intimidation of a traditional timeline, and features like Studio Sound (which cleans up audio quality after the fact) mean you don’t need a recording booth to get something that sounds respectable on a product demo page.
Step-by-Step: The Transcript-Based Editing Workflow
Step 1: Import and Transcribe
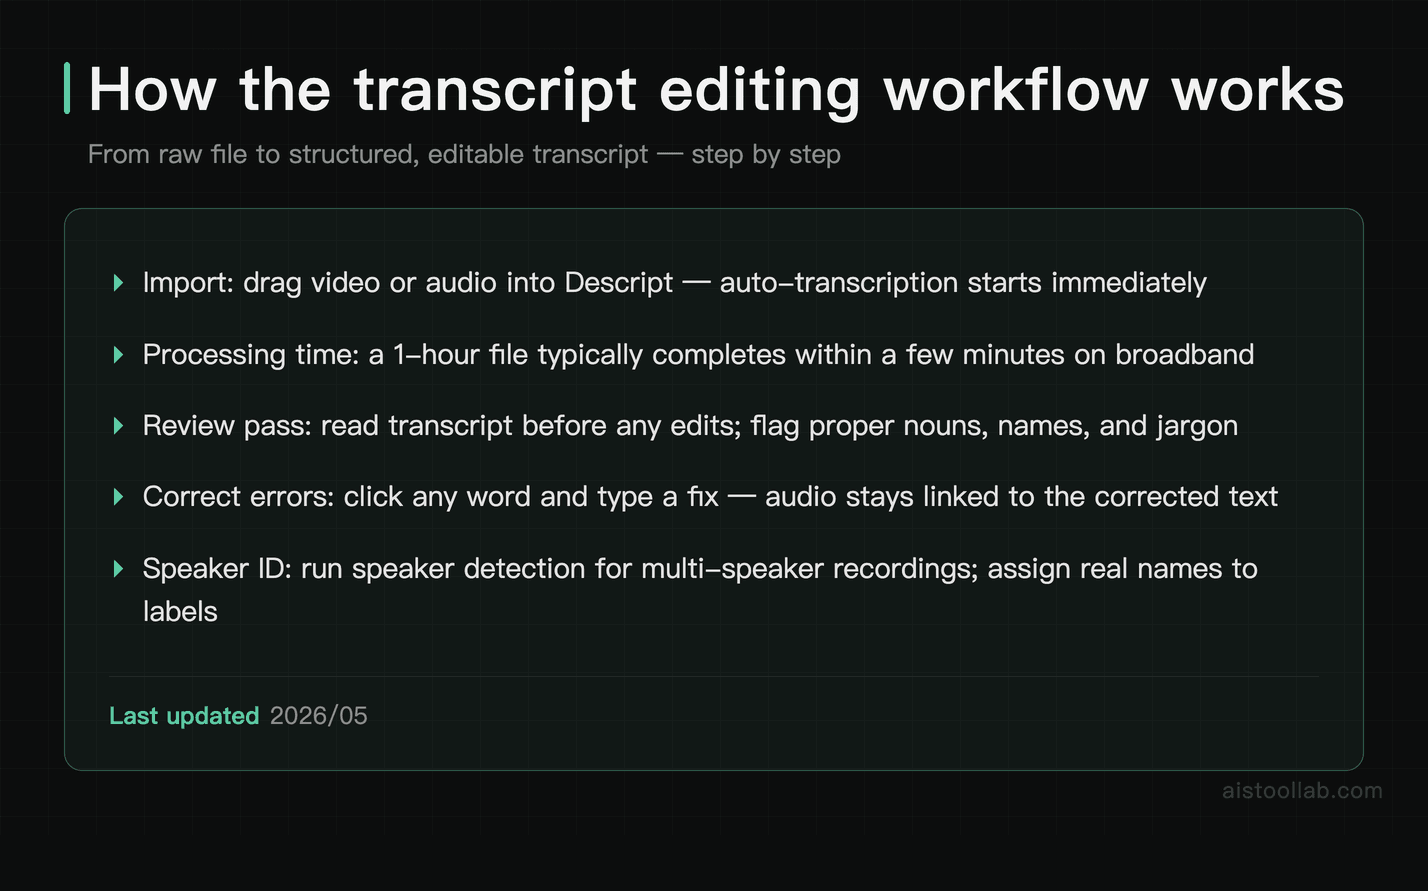
Open Descript, create a new project, and drag your video or audio file into the canvas. Descript will begin transcribing automatically. On a typical broadband connection, a one-hour file usually processes within a few minutes. You’ll see the waveform populate alongside the transcript text in real time.
Once transcription is complete, do a quick read-through for obvious errors before you start editing. Proper nouns — people’s names, company names, technical jargon — are where AI transcription most often slips. Correcting these now saves confusion later, especially if you’re sharing the project with a client who will see the transcript. You can click any word in the transcript and type to correct it; the audio stays linked to the corrected word.
If your recording has multiple speakers, use Descript’s speaker detection feature. It will attempt to separate the transcript by speaker automatically. It’s not perfect, but it’s a solid starting point. Assign names to each speaker label and your transcript becomes a properly formatted interview script, which is genuinely useful if you’re also producing show notes or blog content from the video.
Step 2: Run the Automatic Cleanup Tools
Before you do any manual editing, let Descript’s AI do the grunt work. Go to Actions → Remove Filler Words. Descript will identify every instance of “um,” “uh,” “you know,” “like” (in filler usage), and “sort of” in the transcript and offer to remove them all at once, or let you review each one. I recommend the review option the first time you use it on a new speaker — some fillers are load-bearing in ways that aren’t obvious until you hear the edit.
Next, use Remove Silences. You can set the minimum silence duration to remove — a floor around 0.8 seconds catches the dead air between sentences without making the conversation sound rushed. Descript removes these gaps automatically and the result is a noticeably tighter recording without any manual clip trimming.
If the source audio quality isn’t ideal, this is also the moment to apply Studio Sound. It’s Descript’s AI audio enhancement layer — it reduces background noise, adds a light EQ, and generally makes recorded-in-a-home-office audio sound closer to a proper studio recording. It’s not a miracle worker if the source is truly terrible, but for typical home office or conference room recordings it’s a meaningful improvement.
Step 3: Structural Editing by Reading
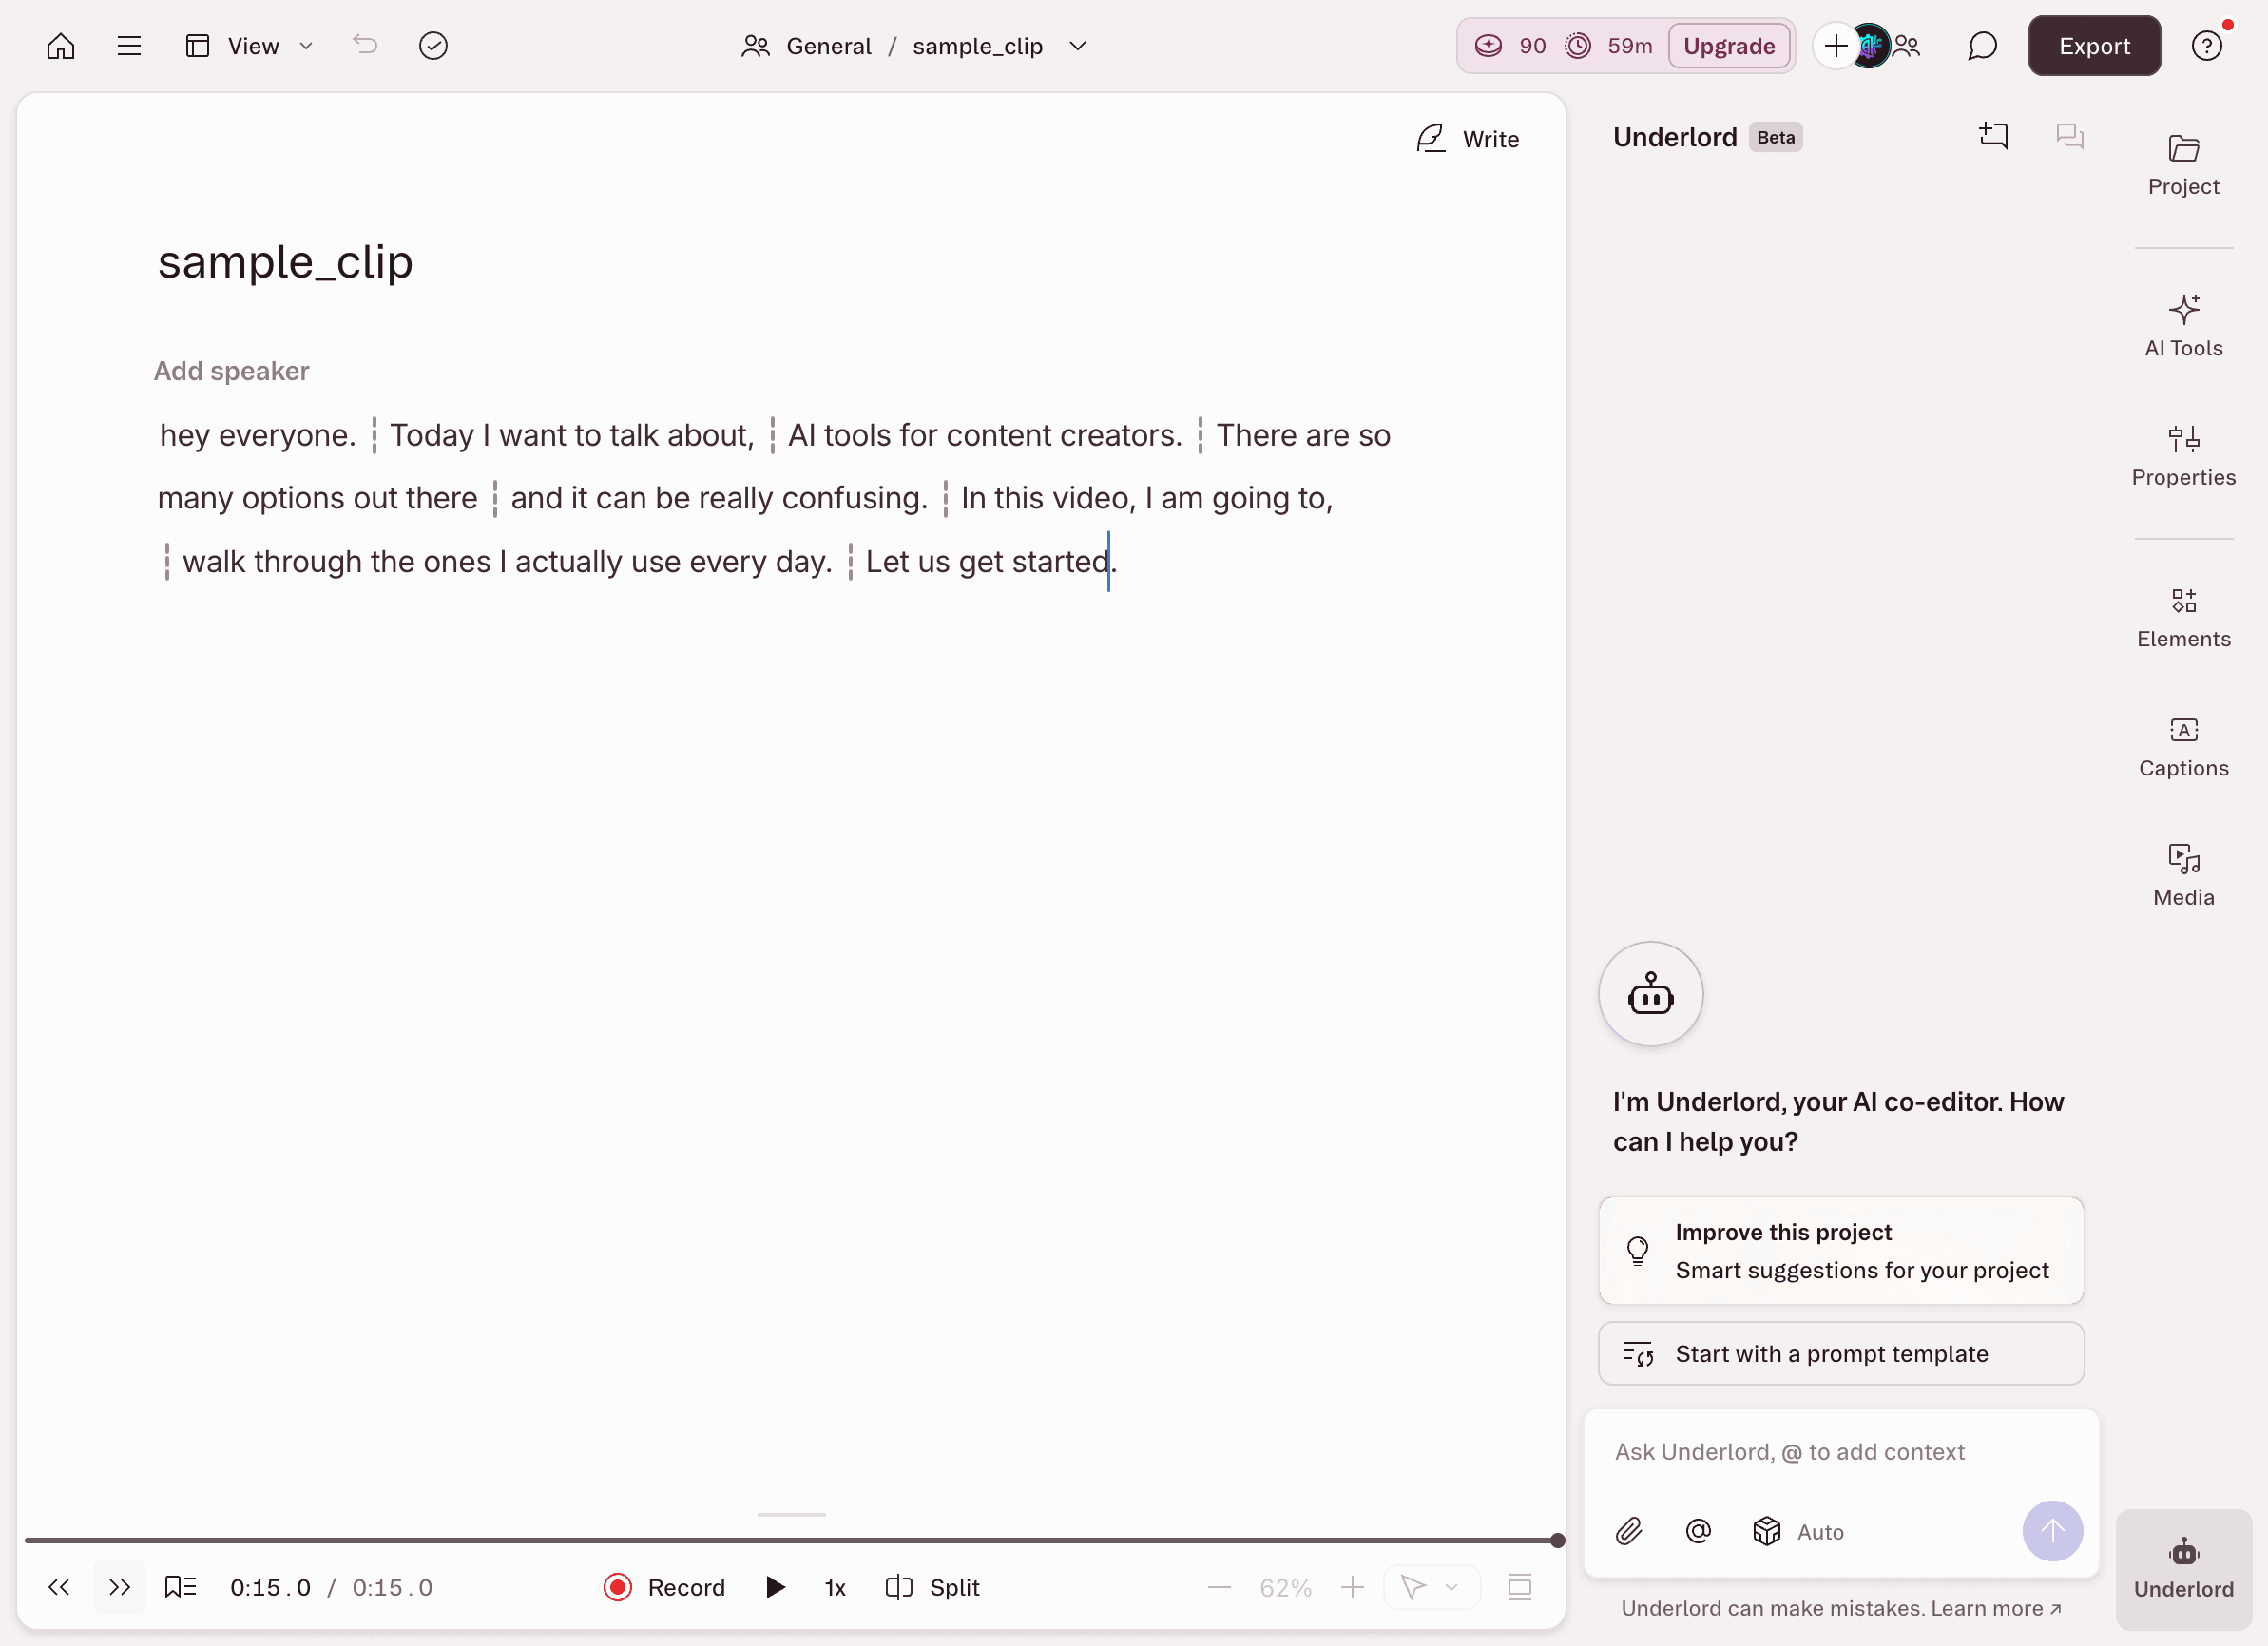
Here’s what Step 3 looks like in practice. In our hands-on run (logged-in free plan), we opened a short test clip and it was auto-transcribed into a fully editable script. Deleting a sentence in the transcript cut the matching footage on the timeline below — no scrubbing, no razor tool. What stood out using it: for talking-head, tutorial, or podcast footage, reading and trimming the text is dramatically faster than dragging clips frame by frame. (The free plan has limited media minutes and AI credits, so plan longer projects around those caps.)
This is the heart of the workflow and where transcript-based editing earns its reputation. Read through the transcript the way you’d read a rough draft of an article. Look for:
- Repeated points that don’t add value the second time
- Tangents that went nowhere useful
- Long wind-ups before the actual answer to a question
- Sections that would work better in a different order
To cut something, highlight the text in the transcript and press Delete. The corresponding video frames are removed. To rearrange a section, cut the text with Cmd+X, place your cursor where you want it to go, and paste. The video follows. It really is that literal — the text is the edit.
For longer projects, the outline view (toggle it in the left sidebar) lets you navigate by scene or chapter, which is useful when you’re doing structural edits on a 60-minute recording and need to jump between sections quickly.
Step 4: Fine-Tune in the Timeline (When Needed)
Transcript editing handles around 90% of the cuts in a typical talking-head or interview video. The remaining 10% — precise frame-level trims, cutaway B-roll placement, transitions — still benefit from the traditional timeline view. Descript’s timeline exists and is functional, though it’s not as deep as Premiere Pro or Final Cut. For most YouTube and podcast use cases, it’s sufficient. For high-end production work, the expectation should be that Descript handles the transcript edit and you finish in a more powerful editor, exporting the Descript project to your preferred NLE.
To add B-roll, drag media files into the timeline track below your main track and position them over the sections you want to cover. Descript supports layered media, so you can overlay screen recordings, stock footage, or images as cutaway material.
Step 5: Overdub for Fixes (Use Sparingly)
Descript’s Overdub feature lets you generate a synthetic voice clone of the speaker to fix mistakes in the audio. Type a correction in the transcript, and Overdub generates new audio that sounds like the original speaker saying it. It’s a genuinely impressive piece of technology.
My honest take: use it for small factual fixes — a number you got wrong, a name you mispronounced, a date that changed after recording. Don’t use it to write new paragraphs of content and put them in someone else’s mouth. Beyond the obvious ethical dimension, it sounds synthetic enough on longer patches that attentive listeners will notice. For brief repairs, it works well and saves an entire re-record session.
Step 6: Add Titles, Captions, and Visual Polish
Descript generates captions automatically from the transcript — this is a feature worth pausing on, because accurate captions used to be an expensive, time-consuming task. The auto-captions sync perfectly because they’re derived from the same transcript you’ve been editing. You can style them, choose burn-in vs. separate subtitle track, and export them as an SRT file for YouTube or wherever you’re publishing.
For titles and lower thirds, Descript has a built-in template library that’s decent for standard use cases. It’s not After Effects, but for a talking-head interview with a simple name-and-title lower third, it covers the need without leaving the app.
Step 7: Export
When you’re done, hit Export. Descript gives you options for resolution, bitrate, and format. For YouTube, 1080p H.264 is the standard. For podcast-only output, you can export MP3 directly. The export quality is solid — in many cases exports can be published directly without running them through a separate compression tool and still look and sound professional on common platforms.
Comparison: Descript vs. Alternatives for Transcript-Based Editing
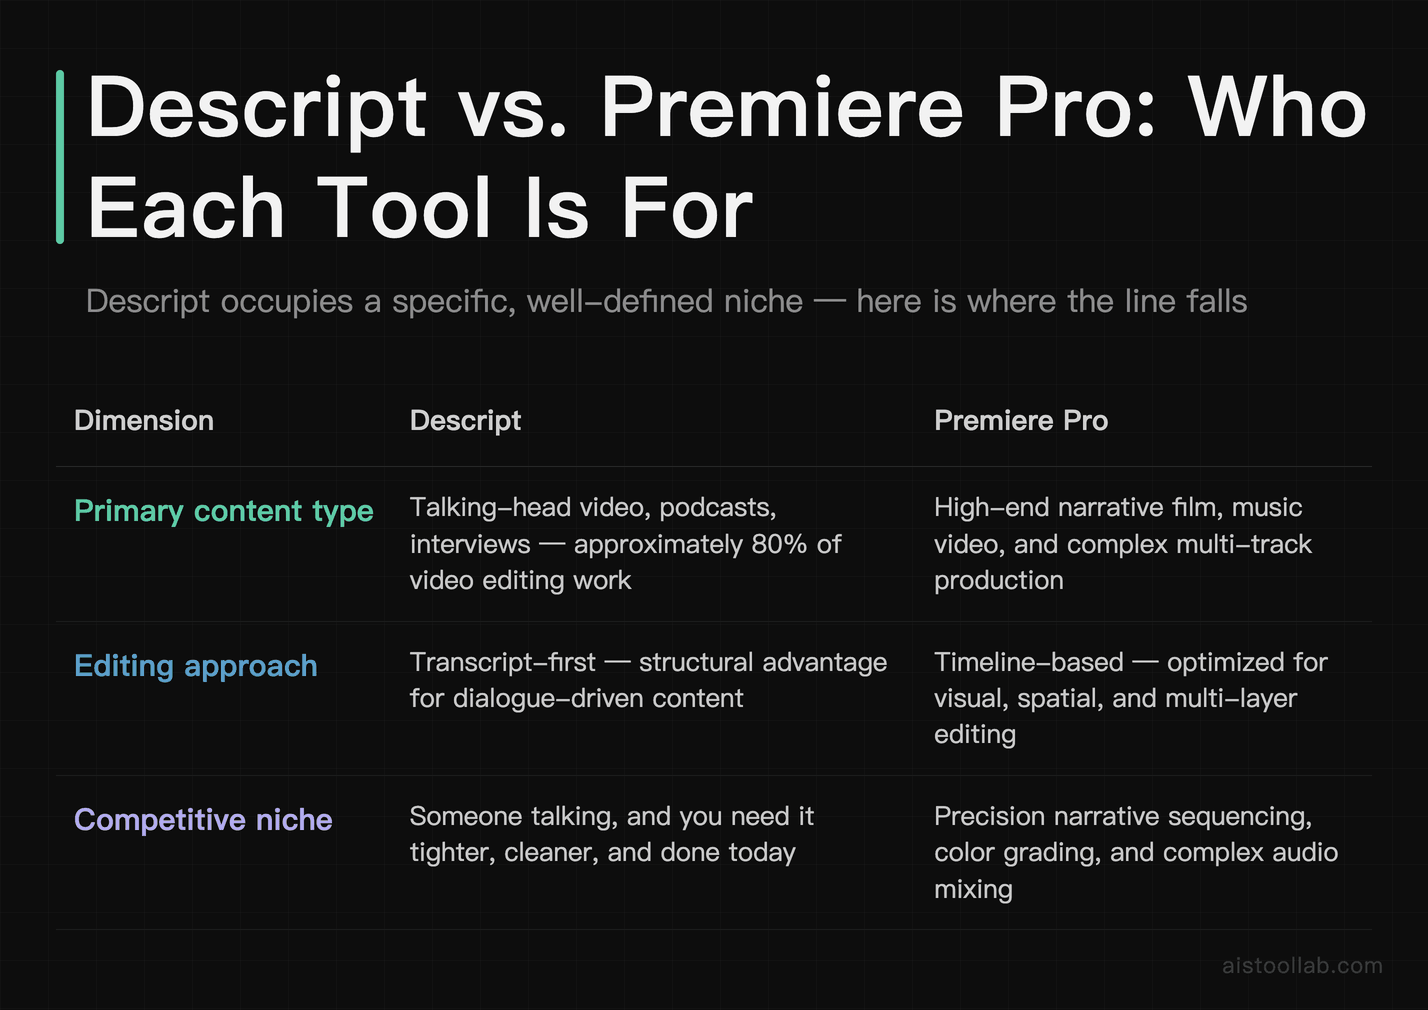
The takeaway from this table is that Descript occupies a specific, well-defined niche. It’s not competing with Premiere Pro for high-end narrative production work. It’s competing for the 80% of video and podcast editing that is essentially: someone talking, and you need it tighter, cleaner, and done today. In that niche, the transcript-first workflow is a genuine structural advantage.
Time-Saving Techniques Worth Knowing
Beyond the core workflow, a handful of Descript-specific habits will meaningfully accelerate your editing sessions once you’ve got the basics down.
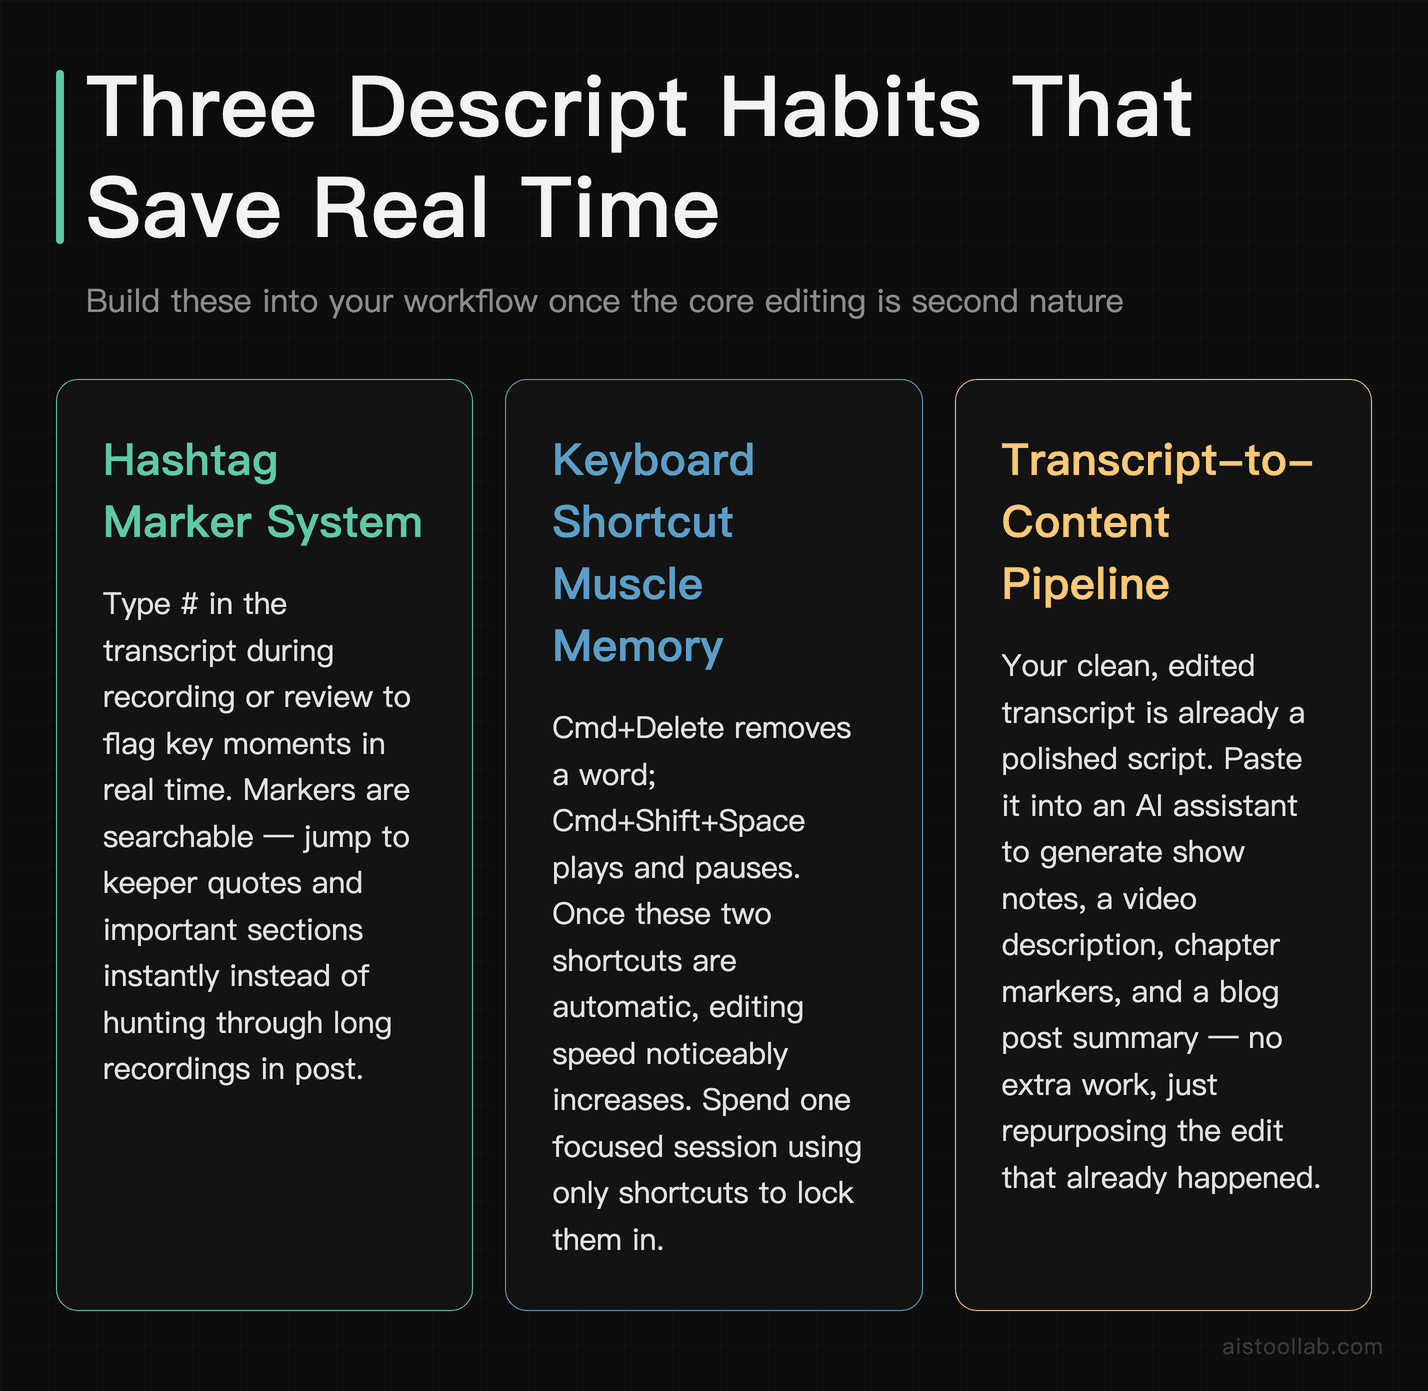
Use the hashtag marker system while recording. If you’re recording directly into Descript or even just reviewing a fresh import, you can type # in the transcript while watching to flag a section. These markers are searchable and let you jump back to important moments quickly in long recordings. For interviewers: mark the moments that feel like keeper quotes in real time instead of hunting for them in post.
Keyboard shortcut muscle memory matters. The workflow really accelerates once Cmd+Delete (remove word) and Cmd+Shift+Space (play/pause) are automatic. Spend a session focused on using shortcuts and the editing speed noticeably increases.
Repurpose the transcript as content. Once your edited transcript is clean, you have a highly accurate, already-edited script of your final video. Copy it into a writing tool or paste it into a prompt for an AI assistant to generate your show notes, video description, chapter markers, and a blog post summary. You’re not doing extra work — the transcript that fell out of the editing process is doing double duty. For anyone running a content operation, this is one of the most underused advantages of the whole workflow.
Create reusable templates for your show format. If you produce a recurring show — same structure every episode — set up a Descript template with your intro music, lower third style, and outro baked in. Each new episode starts from that template, and you only need to replace the main body content. Consistency improves and setup time drops.
Frequently Asked Questions
How accurate is Descript’s transcription, and what happens when it gets things wrong?
Descript’s transcription is powered by a combination of its own AI models and, depending on your settings, options to use Whisper-based processing. For clear, standard English audio recorded in a reasonably quiet environment, the accuracy is very high — most users report needing only minor corrections on properly recorded material. The accuracy does drop with strong accents, heavy background noise, fast speech, or highly technical jargon. When errors do occur, fixing them is simple: click on the word in the transcript, type the correction, and the edit is saved. The underlying audio does not change; only the text representation changes. One important nuance: correcting a transcript word does not magically change what was said in the audio. If the speaker actually said the wrong word, you’d need to use Overdub or re-record. Transcript corrections primarily affect the text output (captions, exported transcripts, show notes) rather than the audio itself. Always do a listening pass after your transcript editing to catch any places where text corrections may have created a mismatch with the actual audio.
Can I use Descript for long-form content like hour-long interviews or full documentary edits?
Yes, and it’s actually where the workflow shines. For a one-hour interview, the transcript for the whole recording is available in one scrollable document, which means you can read through the entire interview the way you’d read a long article and make structural decisions about what to keep — without scrubbing a timeline frame by frame. That said, there are practical limits. Very long projects (multiple hours) can become slower to work with inside the app, particularly on older machines. Many serious users working on long-form content use Descript for the transcript editing phase — getting to a tight rough cut — and then export the edited media to Final Cut Pro or Premiere Pro for finishing work like color grading, complex B-roll layering, and intricate audio mixing. Think of Descript as the excellent first 80% of the edit for long-form content, not necessarily the full finishing tool.
Is the free plan actually usable, or is it too limited to be practical?
The free plan is genuinely useful for getting started and understanding whether the workflow clicks for you, but it has transcription hour limits and feature restrictions that will feel constraining on real projects. As of current plan structures, the free tier gives you a limited number of transcription hours per month — enough to try the workflow thoroughly on a short project or two, but not enough to run a regular podcast or video production schedule. Studio Sound and some of the more advanced AI features are also paywalled. My honest recommendation: use the free plan for a proper two-week evaluation on real content. Give it a genuine trial on a project you’d actually publish. If it works for your use case — and for most talking-head video and podcast work it will — the paid tier at roughly $12/month is easy to justify compared to the time it saves. If you’re on the fence after a real evaluation, you’ll have a much clearer answer than if you just poke at it with a demo file.
How does Overdub (the voice cloning feature) actually work, and is it ethical to use?
Overdub works by training a voice model on your own voice — or with consent, on another speaker’s voice. You record a set of training phrases through Descript’s onboarding flow, the model processes them, and then you can type text that gets rendered in that voice. For fixing mistakes in your own recordings — a word you mispronounced, a statistic that changed after you recorded, an awkward sentence you want to smooth out — it’s a genuinely practical tool. The ethical dimension is real and worth thinking about clearly. Descript requires voice consent confirmation, meaning you can only create Overdub models for your own voice or with explicit recorded consent from the speaker. Using Overdub to fabricate statements by other people without their consent is a misuse of the tool and, depending on context and jurisdiction, potentially a legal problem. For the legitimate use case — fixing small errors in your own voice recordings — it’s a reasonable creative tool. Treat it as a surgical fix for specific lines, not as a way to rewrite what you said wholesale. Extended synthetic patches tend to sound noticeably artificial to careful listeners.
What export quality does Descript produce, and is it good enough for professional use?
For most distribution contexts — YouTube, podcast platforms, social media, website embeds — Descript’s export quality is professional-grade. You can export video at up to 4K resolution with selectable bitrate settings, and the audio export for podcast use is clean. Exports are generally suitable as client deliverables without additional compression tools. Where you might want to go further: if you’re delivering files for broadcast, digital cinema, or a context with specific technical specs (certain streaming platform requirements, for example), Descript’s export options may not give you the granular codec control you need. In those cases, the workflow is still to edit in Descript for its transcript capabilities and then finish in a dedicated professional NLE. For the vast majority of independent creators, podcasters, and small business video teams, the export quality is simply not a limitation in practice.
How does Descript handle multi-camera edits?
Descript is not primarily designed for multi-camera editing in the traditional sense, but it handles common multi-cam scenarios reasonably well. If you have a main camera angle and a second camera angle for the same interview, you can import both into the same project, align them on the timeline, and switch between them. The transcript remains linked to your primary audio source, so the cut logic still works. What Descript doesn’t do is the automated multi-cam sync and switching that something like Final Cut Pro’s Angle Editor provides. For a simple two-camera talking head interview, the manual approach within Descript is workable. For a complex multi-camera shoot with four or more angles, live switching logic, or elaborate cutaway timing, the workflow would benefit from finishing in a more capable NLE after the transcript editing phase in Descript.
Can Descript help me repurpose long videos into short clips for social media?
Yes, and this has become one of the more popular use cases. Descript has a dedicated Clip Creation feature that allows you to select a portion of your transcript, set the aspect ratio to vertical (9:16 for TikTok, Reels, Shorts), and export it as a standalone clip. Because you’re selecting by text, finding the punchy 60-second quote that makes a good standalone clip is a reading task rather than a timeline-scrubbing task. Auto-captions populate automatically for the clip since they inherit from the parent transcript. The workflow is: edit the full video first, then go back through the transcript and highlight the moments with obvious standalone value, create clips from each, and schedule them separately. This is a legitimate content multiplication strategy that doesn’t require a dedicated social media editing tool alongside your main editing workflow. That said, tools specifically designed for short-form clip generation (like Opus Clip) have more automation in the clip selection and styling process. Descript’s clip tools are solid but more manual.
Is Descript worth it if I’m already paying for Adobe Creative Cloud?
This is a question I get from creative professionals a lot, and the honest answer depends on how much of your work is dialogue-driven content. Adobe Premiere Pro now has its own Text-Based Editing feature, which provides a meaningful portion of what Descript does within an app you’re already paying for. If you’re a professional editor who lives in Premiere, the Text-Based Editing panel may cover your needs without adding another subscription. Where Descript still has an edge is in the depth and polish of the transcript-first experience — the filler word removal workflow, the Studio Sound AI processing, the Overdub correction feature, and the simplicity of sharing projects for client review. If you’re a content creator or podcaster who doesn’t use the full Creative Cloud suite, paying for Premiere Pro just to get its transcript editing is a much worse deal than using Descript directly. The comparison really comes down to: are you a video professional who wants transcript editing as a tool in a larger production workflow, or is transcript-based editing the center of your workflow? For the latter, Descript is the purpose-built option. If this kind of AI-powered content toolkit interests you, I’ve covered the broader landscape in my Best AI Tools for Writers and Content Creators in 2026 roundup.
Pro Tips for Better Output Quality
Getting clean output from Descript is largely a function of getting the inputs right and being deliberate about the order of operations in your edit. A few specific habits make a real difference.
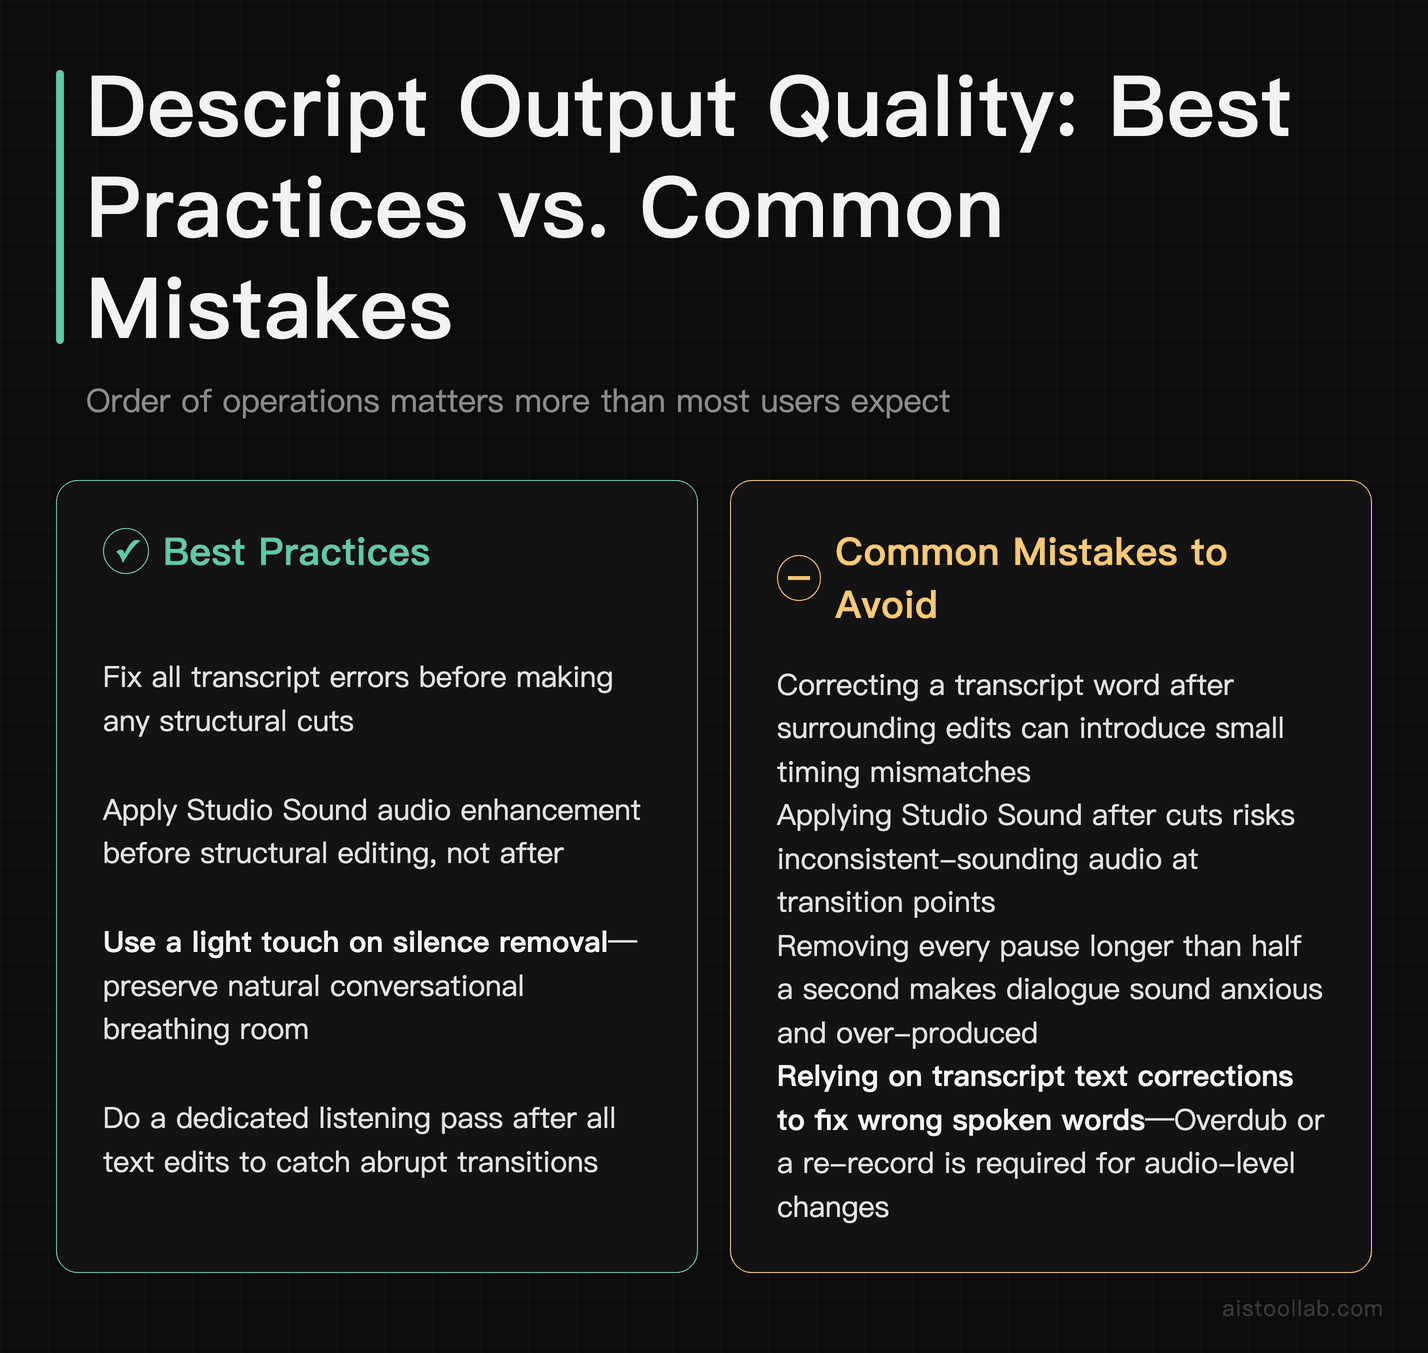
Fix all transcript errors before you make cuts. If you correct a transcript word after you’ve already made edits around it, you can occasionally introduce small timing mismatches. Doing a full transcript review and correction pass before any structural editing is cleaner and faster overall.
Apply Studio Sound before structural editing, not after. The audio enhancement processes the entire clip. If you apply it after making cuts, you’re reprocessing material that’s already been processed, and the transitions between cuts may sound slightly different from the body of the clip. Apply enhancement first, then edit.
Don’t over-delete pauses. The silence removal tool is powerful but requires a light touch. Conversations have a natural rhythm; removing every pause longer than half a second can make the result sound anxious or over-produced. Context matters: a training video can be quite tight, but a casual podcast interview often sounds better with natural breathing room preserved.
For those of you managing content across multiple tools and platforms — pairing Descript with a solid distribution and marketing workflow is where the real compounding value comes from. My Best AI Tools for Marketing and SEO in 2026 piece covers how to think about that stack.
My Verdict: Who Should Actually Use This Workflow?
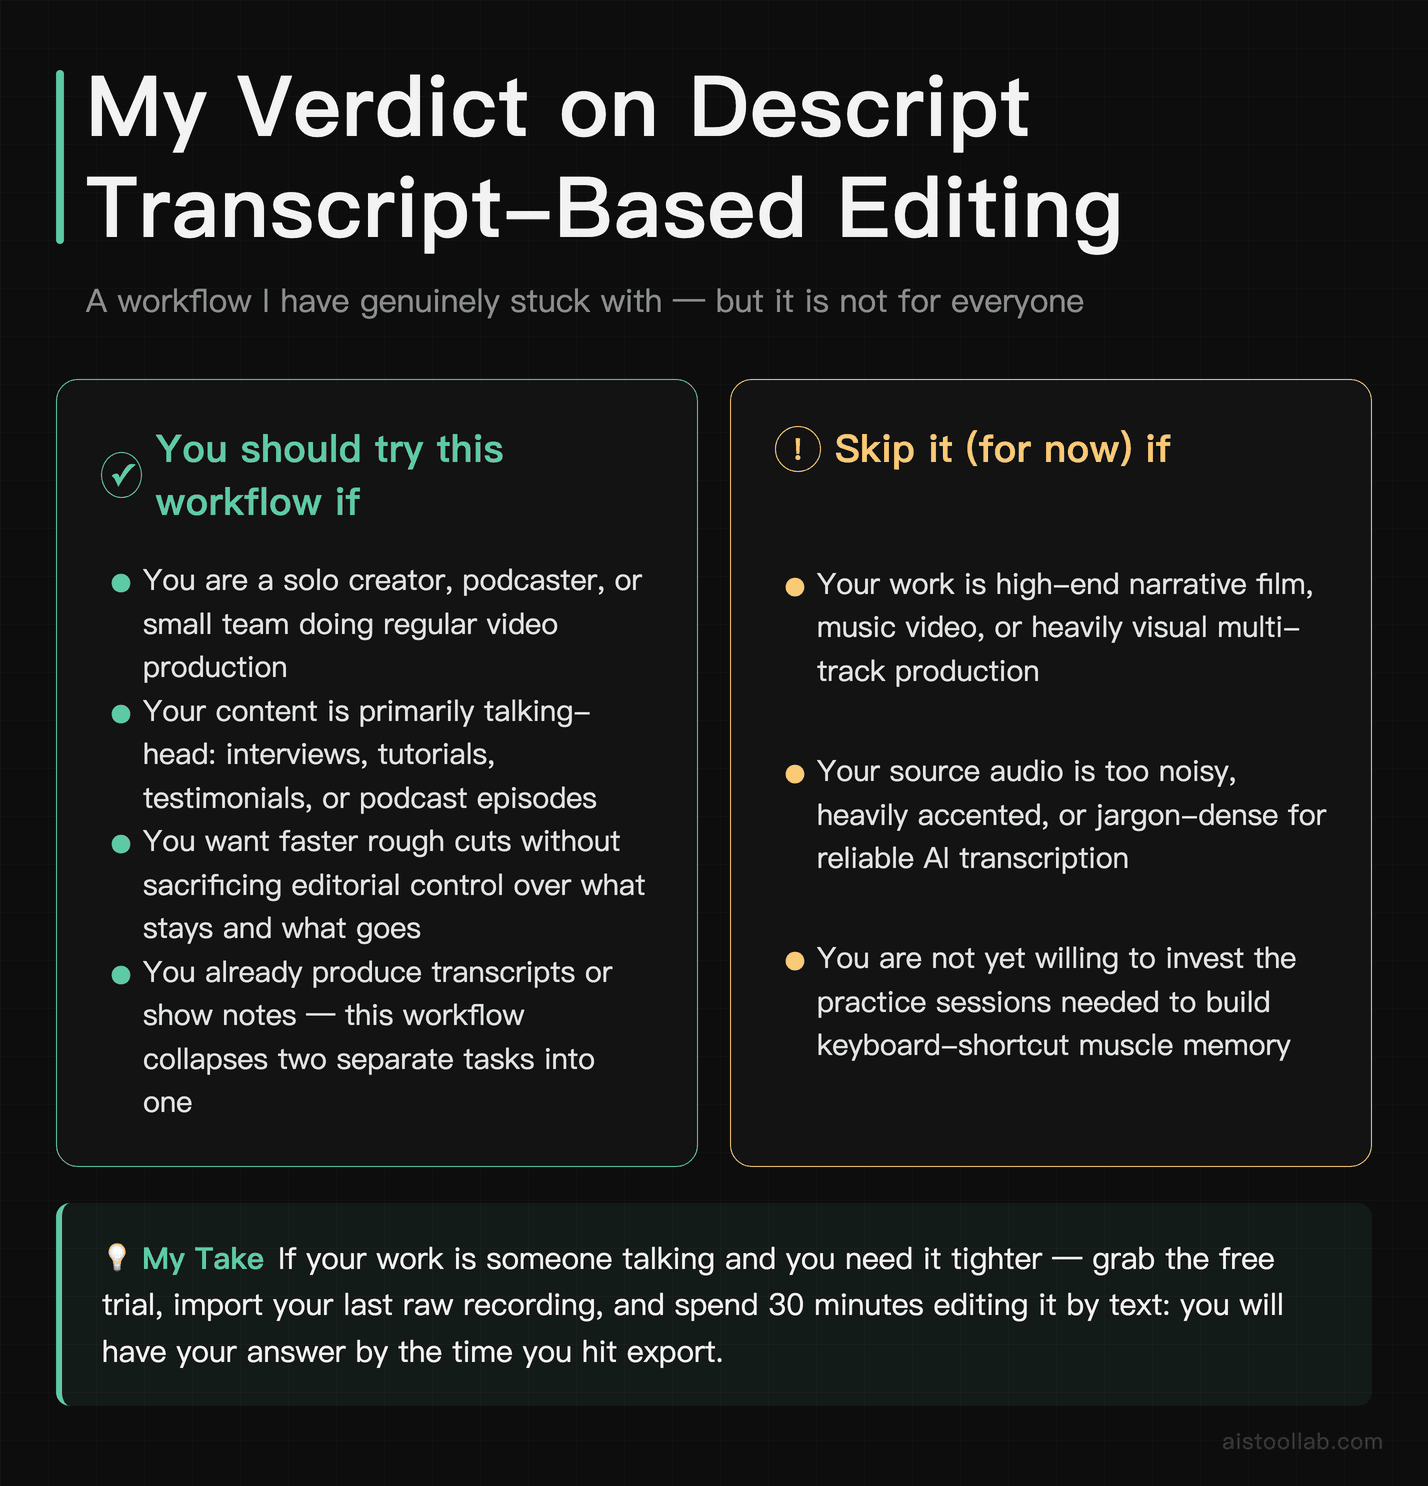
Transcript-based editing in Descript is one of the few AI-powered workflow changes that tends to stick rather than being a one-off novelty. It’s not magic — it still requires real editorial judgment, it has a learning curve measured in sessions rather than minutes, and it’s not the right tool for every type of video production.
But for the specific use case it was designed for — talking-head video, interviews, podcasts, tutorials, and any content where a human is speaking and you need to make it tighter and better — it’s a meaningfully more efficient workflow than the traditional timeline approach. The transcript is the edit. Once that idea stops feeling strange and starts feeling obvious, the productivity difference compounds across every project.
If you’re a solo creator, podcaster, or small team doing regular video production and you haven’t tried this yet: grab the free trial, import your most recent raw recording, and spend 30 minutes editing it by text. You’ll have your answer by the time you hit export. That’s the call to action here — not a recommendation based on a feature list, but a workflow you can verify for yourself in less time than it takes to watch a tutorial video about it.
And if you’re curious about how AI tools are reshaping the broader content creation toolkit, the Best AI Tools for Small Business Owners in 2026 guide covers some of the adjacent tools that pair well with this kind of workflow.
Last updated: 2026
Explore more AI tools
👉 Browse the AI Tools Library to find the right tools for your workflow.
Related reading: Runway AI Gen-3 Tutorial 2026: Master Video Generation with Advanced Prompting and Motion Control