📌 Editor’s note (July 2026): This article reflects the AI models and versions current at the time of writing. The AI landscape moves quickly and newer model versions may have been released since. We’ve kept the original references as a snapshot from that period rather than rewriting the analysis.
Contents
The Prompt That Changed How I Use AI Tools
A classic complaint goes like this: ChatGPT is “useless for legal summaries” — the outputs are vague and wishy-washy, impossible to actually use. But look behind that complaint and the prompt usually reads something like: “Summarize this contract for me.” No context. No format. No role. No constraints. Just vibes.
Restructure that prompt properly, and the same model can produce output clean enough to paste into a client brief. Same model. Completely different results. That’s the thing about prompt engineering — it’s not magic, and it’s not a dark art. It’s just knowing how the model wants to receive information, and giving it that.
I’ve been using ChatGPT and Claude professionally for over two years now — for content workflows, code review, research synthesis, and client deliverables. In that time, I’ve built up a set of techniques that consistently work across both models. This isn’t a theoretical list. Every technique here comes with a real before-and-after example, and I’ll tell you honestly when something is overrated and when it actually moves the needle.
Why Most Prompt Advice Misses the Point
Most prompt guides give you a list of tactics without telling you why they work. So you try them, get inconsistent results, and assume you’re doing it wrong. You’re not — the guide just skipped the explanation. Before diving into techniques, here’s the mental model that makes everything else click: language models are next-token predictors trained on human-written text. When you write a prompt, you’re essentially setting up a context that makes the output you want the statistically likely continuation. Every technique below is just a way to make that desired output more likely.
That’s also why I have a complicated relationship with the idea that prompt engineering is “overhyped.” It’s overhyped when people treat it as a substitute for clear thinking. It’s completely legitimate when it’s used to systematically communicate intent to a model. I actually wrote about this distinction in more depth — check out my take on Why Prompt Engineering Is Overhyped (And What Actually Improves AI Output) if you want the full argument.
Alright. Let’s get into the actual techniques.
Role Prompting: Writing Roles That Actually Work
Role prompting is probably the most talked-about technique, and it’s also the most misunderstood. The common version goes: “You are a helpful assistant.” That does almost nothing. The model already assumes it’s a helpful assistant. What you want is a role that narrows the domain, sets the tone, and implies a specific output style.
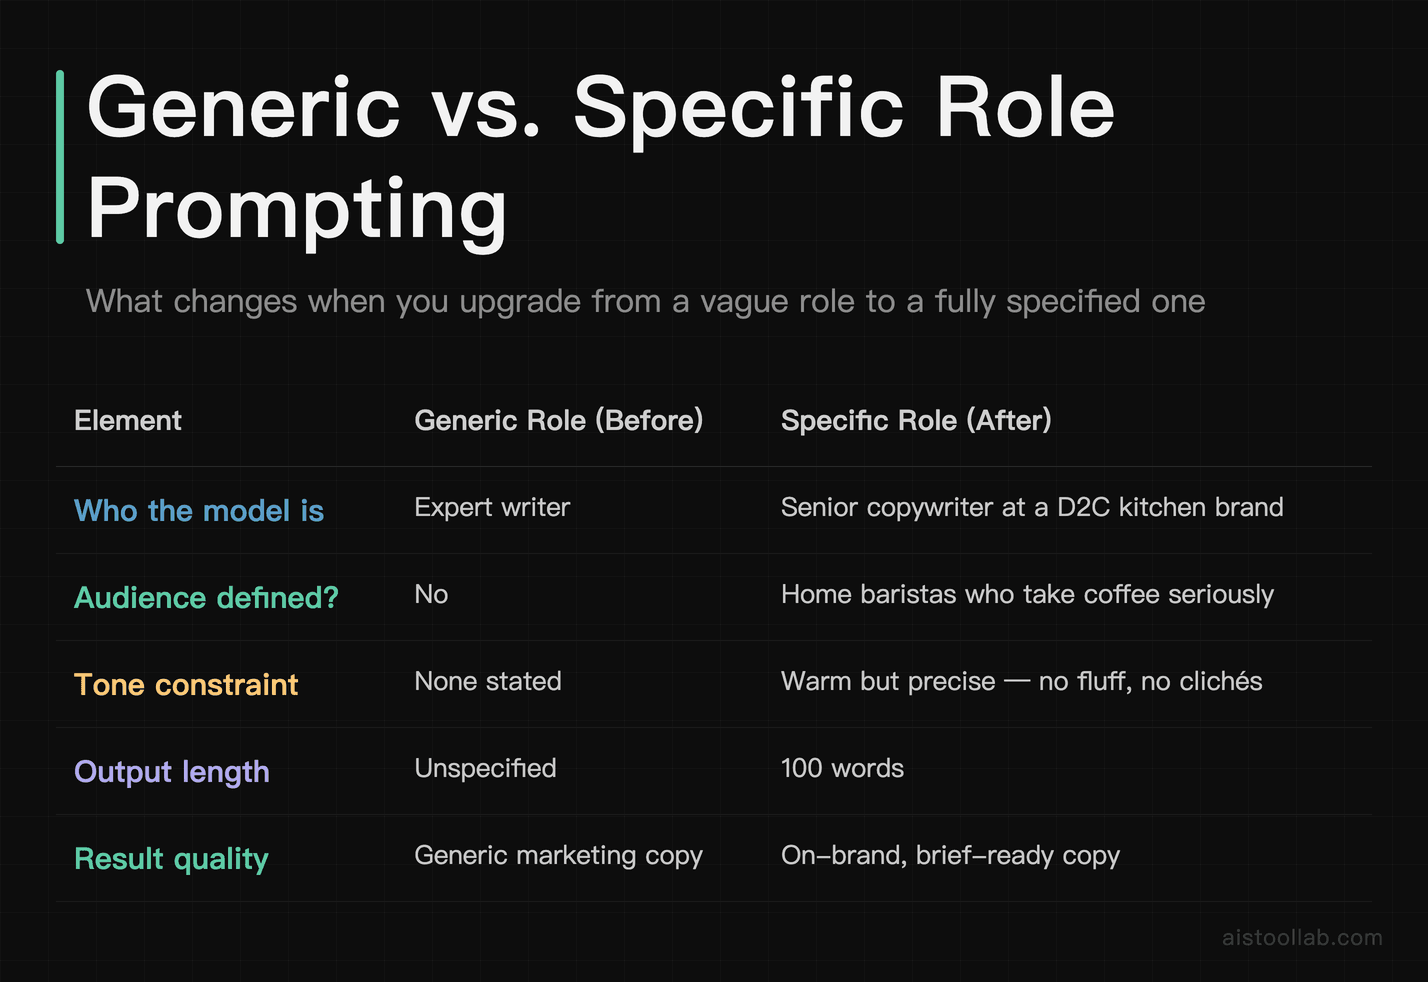
Technique 1: Specific Role Over Generic Role
Before: “You are an expert writer. Write me a product description for this coffee maker.”
After: “You are a senior copywriter at a D2C kitchen brand. Your writing style is warm but precise — no fluff, no clichés. You write for an audience of home baristas who take their morning coffee seriously. Write a 100-word product description for this coffee maker: [specs].”
The difference in output is substantial. The “before” version gets you generic marketing copy. The “after” version gets you something that sounds like it was written for an actual brand. The role tells the model not just who it is, but who it’s talking to and what the constraints are.
Technique 2: Role + Negative Constraints
Roles work even better when you tell the model what to avoid. This is particularly useful when you’ve gotten burned by a specific failure mode before.
Before: “You are a financial analyst. Explain this earnings report.”
After: “You are a financial analyst writing for an audience of retail investors with no accounting background. Avoid jargon. Do not use phrases like ‘robust growth’ or ‘headwinds.’ Translate every metric into plain language. Explain this earnings report: [paste].”
Adding explicit negatives cuts off the model’s tendency to drift into safe, generic territory. It sounds counterintuitive — giving more restrictions for better output — but it consistently works.
Technique 3: The “Skeptical Expert” Role
One of my favorite role setups for research and analysis tasks. Instead of asking for a balanced overview, you get genuinely critical thinking.
Prompt: “You are a skeptical researcher reviewing this business plan. Your job is not to be encouraging — your job is to find every assumption that could be wrong, every market claim that isn’t supported, and every risk that’s been glossed over. Be specific. Do not soften your critique.”
I’ve used this on Claude for reviewing pitch decks and it’s genuinely one of the most useful things I do. The output reads like feedback from a smart, slightly annoyed mentor — which is exactly what you want.
Chain-of-Thought Prompting: When and How to Use It
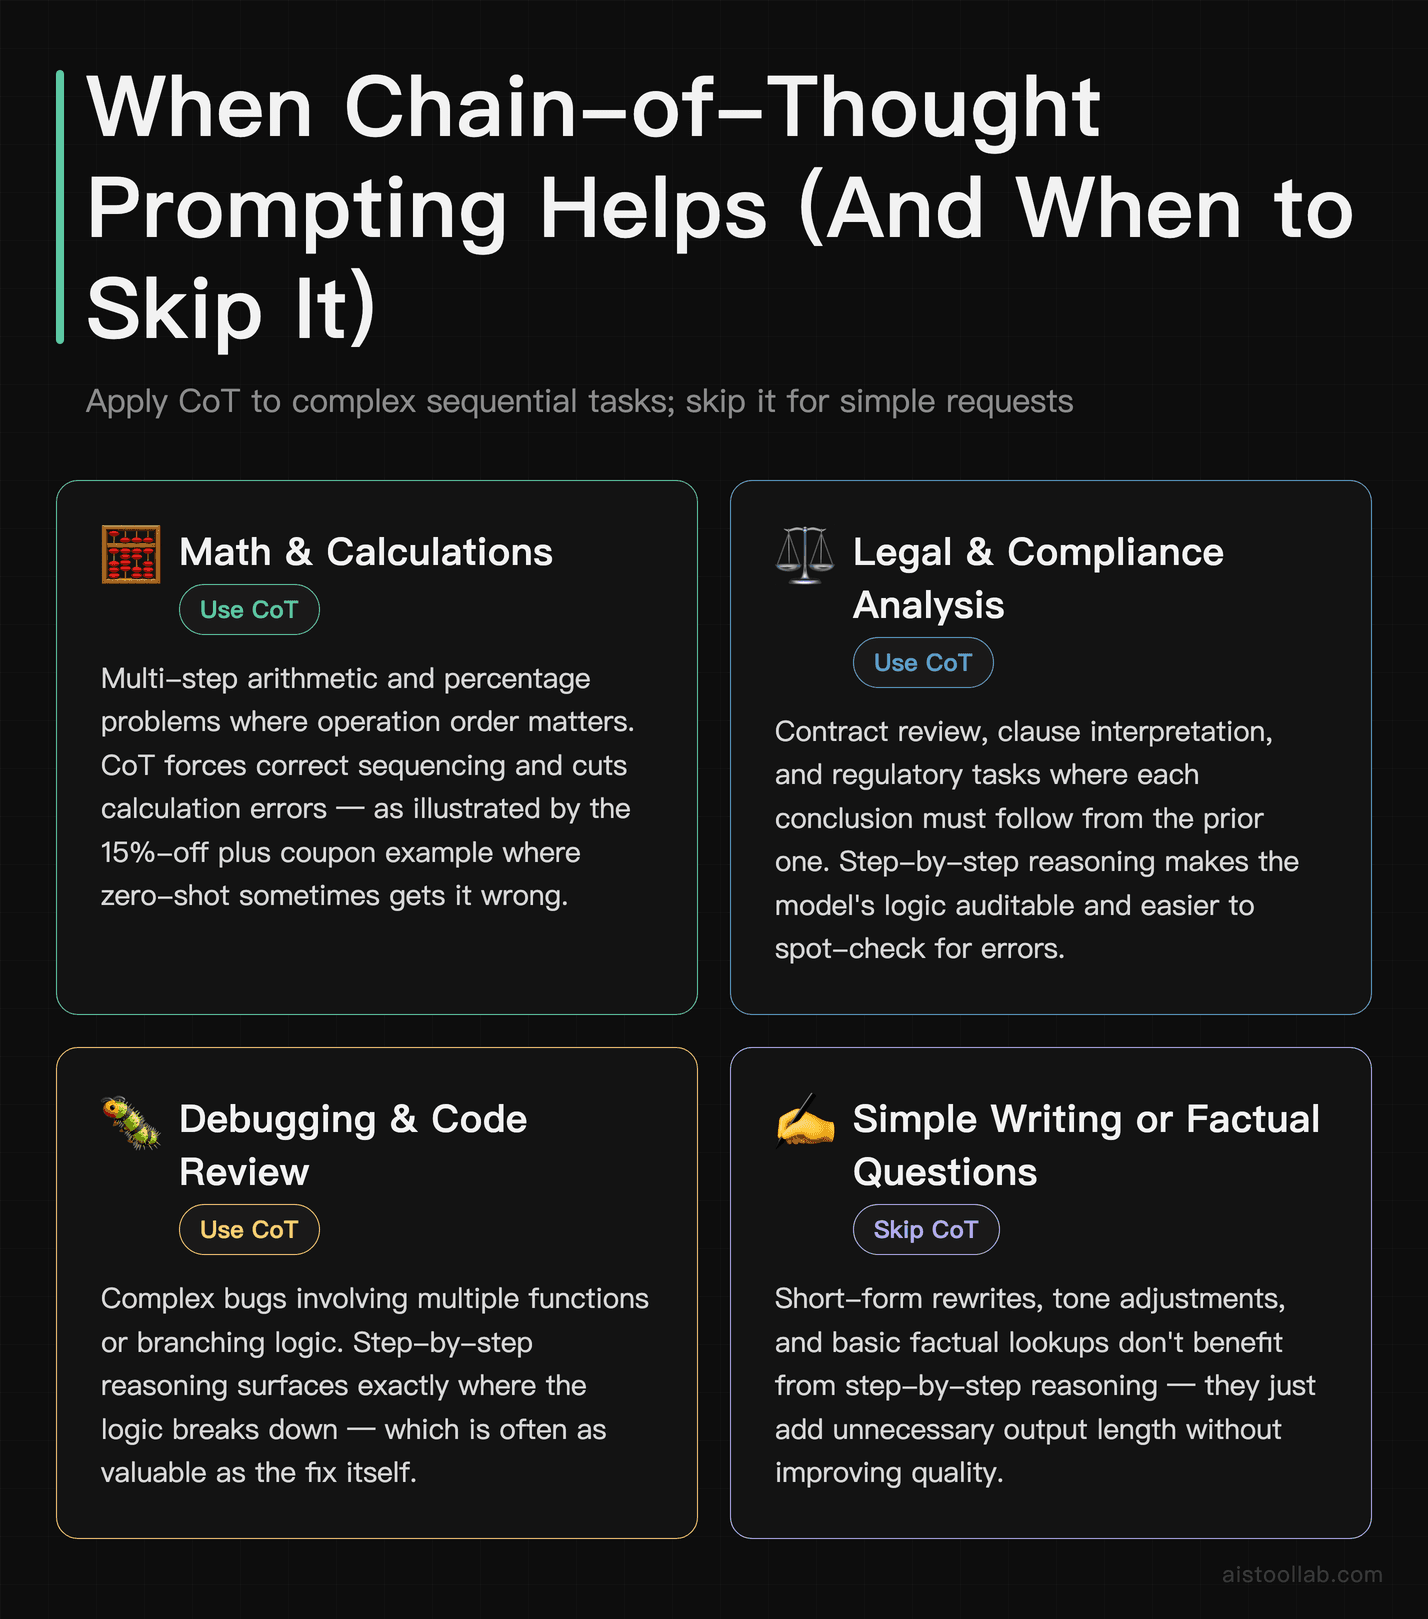
Chain-of-thought (CoT) prompting means explicitly asking the model to reason through a problem step by step before giving an answer. It improves accuracy on complex tasks — and it also makes it easier for you to spot where the model went wrong, which is arguably just as valuable.
Technique 4: “Think Step by Step” — When It Actually Helps
This works best for: math problems, multi-step logic, legal analysis, debugging, and any task where the answer depends on a sequence of correct intermediate conclusions. It doesn’t help much for straightforward factual questions or simple writing tasks.
Before: “A store is offering 15% off a $240 item. If I also have a $20 coupon, what do I pay?”
After: “A store is offering 15% off a $240 item. If I also have a $20 coupon that applies after the percentage discount, what do I pay? Think through this step by step.”
The first version sometimes produces a wrong answer if the model conflates the order of operations. The second version almost always gets it right because the step-by-step instruction forces it to sequence the calculation correctly.
Technique 5: CoT With Explicit Steps
For complex professional tasks, you can scaffold the reasoning yourself rather than leaving it to the model.
Prompt: “Evaluate this marketing strategy. Follow these steps exactly: (1) Identify the stated goal. (2) Assess whether the tactics align with that goal. (3) Identify what’s missing. (4) Suggest one concrete change. Do not skip steps.”
The “do not skip steps” instruction sounds silly, but it matters. Without it, the model will sometimes compress or skip steps when it thinks the answer is obvious. Spoiler: it’s sometimes wrong about that.
Technique 6: Ask for Confidence Levels
Underused, genuinely useful. Especially on Claude, which tends to handle uncertainty well.
Prompt addition: “After your analysis, rate your confidence in each conclusion on a scale of low / medium / high, and explain briefly why.”
This forces the model to flag where it’s extrapolating versus where it’s on solid ground. It doesn’t eliminate hallucinations, but it does give you a better signal for what to verify independently.
Few-Shot Examples That Consistently Improve Accuracy
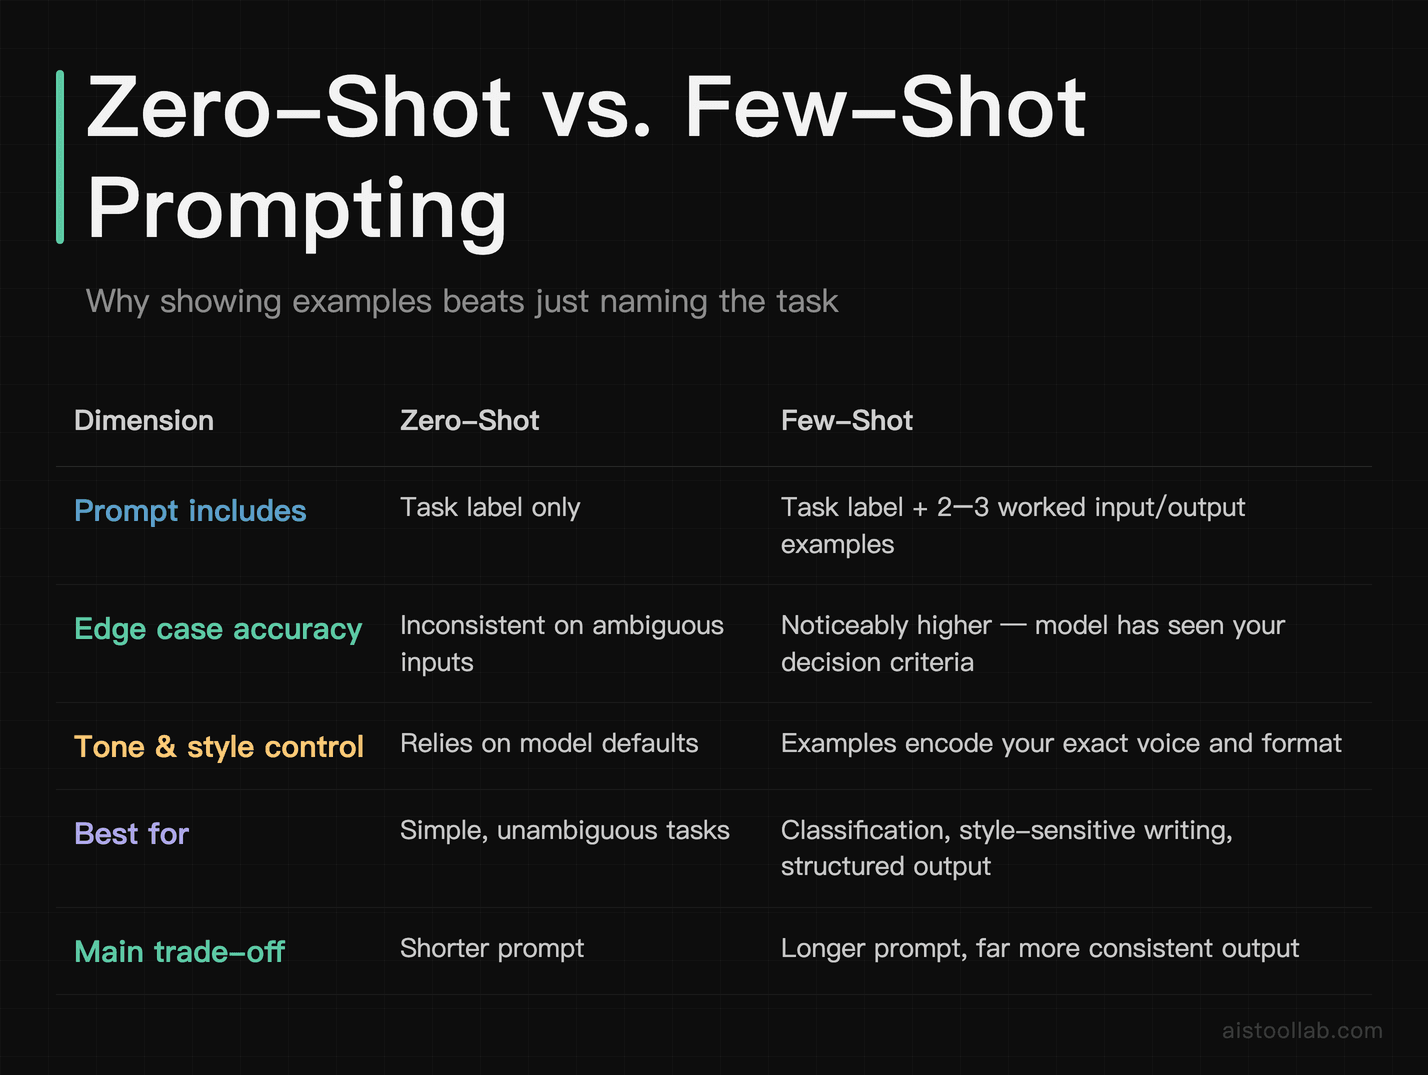
Few-shot prompting means showing the model two or three examples of the input-output pattern you want before giving it the real task. It’s one of the highest-ROI techniques in this list, and it’s dramatically underused by people who aren’t already thinking like engineers.
Technique 7: The Standard Few-Shot Setup
Before (zero-shot): “Classify the sentiment of this customer review as positive, negative, or neutral.”
After (few-shot):
“Classify the sentiment of customer reviews as positive, negative, or neutral. Here are examples:
Review: ‘Fast shipping, product exactly as described.’ → Positive
Review: ‘Arrived damaged and customer service was no help.’ → Negative
Review: ‘It works, but nothing special.’ → Neutral
Now classify this review: ‘The quality is fine but the color was slightly different than shown.’”
With zero-shot, models sometimes waffle on edge cases. With few-shot examples that include a neutral case, the accuracy on ambiguous reviews goes up noticeably. The model has seen your decision criteria, not just your label names.
Technique 8: Few-Shot for Tone and Style
This is how I use it most often in content work. When I need Claude or ChatGPT to write in a specific house style, I paste in two or three paragraphs of existing content I like and say: “Write in this style.”
Prompt structure: “Here are two examples of our brand voice: [Example A] [Example B]. Now write a 150-word intro for a blog post about [topic] in the same voice.”
This works far better than trying to describe your style in abstract terms like “conversational but professional.” Show, don’t tell. The model can reverse-engineer tone, sentence length, formality level, and even humor style from actual examples. For more on how content teams use this at scale, I covered it in depth in How Content Creators Are Using AI Tools to Scale Production in 2025.
Technique 9: Intentionally Include a Wrong Example (Contrast Prompting)
This is a slightly advanced variation — show the model what you don’t want alongside what you do want.
Prompt: “Here’s an example of a weak product headline: ‘High-Quality Coffee Maker for Your Home.’ Here’s a strong one: ‘Your 6am Just Got a Lot More Bearable.’ Write three headlines for this product: [specs]. Match the strong example’s style, not the weak one.”
The contrast makes the quality bar explicit. The model understands “good” better when it can compare it against “bad.”
System Prompt Structure: Building Repeatable Results
If you’re using the API directly or a platform that lets you set system prompts (like Claude.ai’s Projects feature or ChatGPT’s custom instructions), this is where you get compound value. A well-structured system prompt means you don’t have to re-explain your context every single conversation.
Technique 10: The Four-Block System Prompt
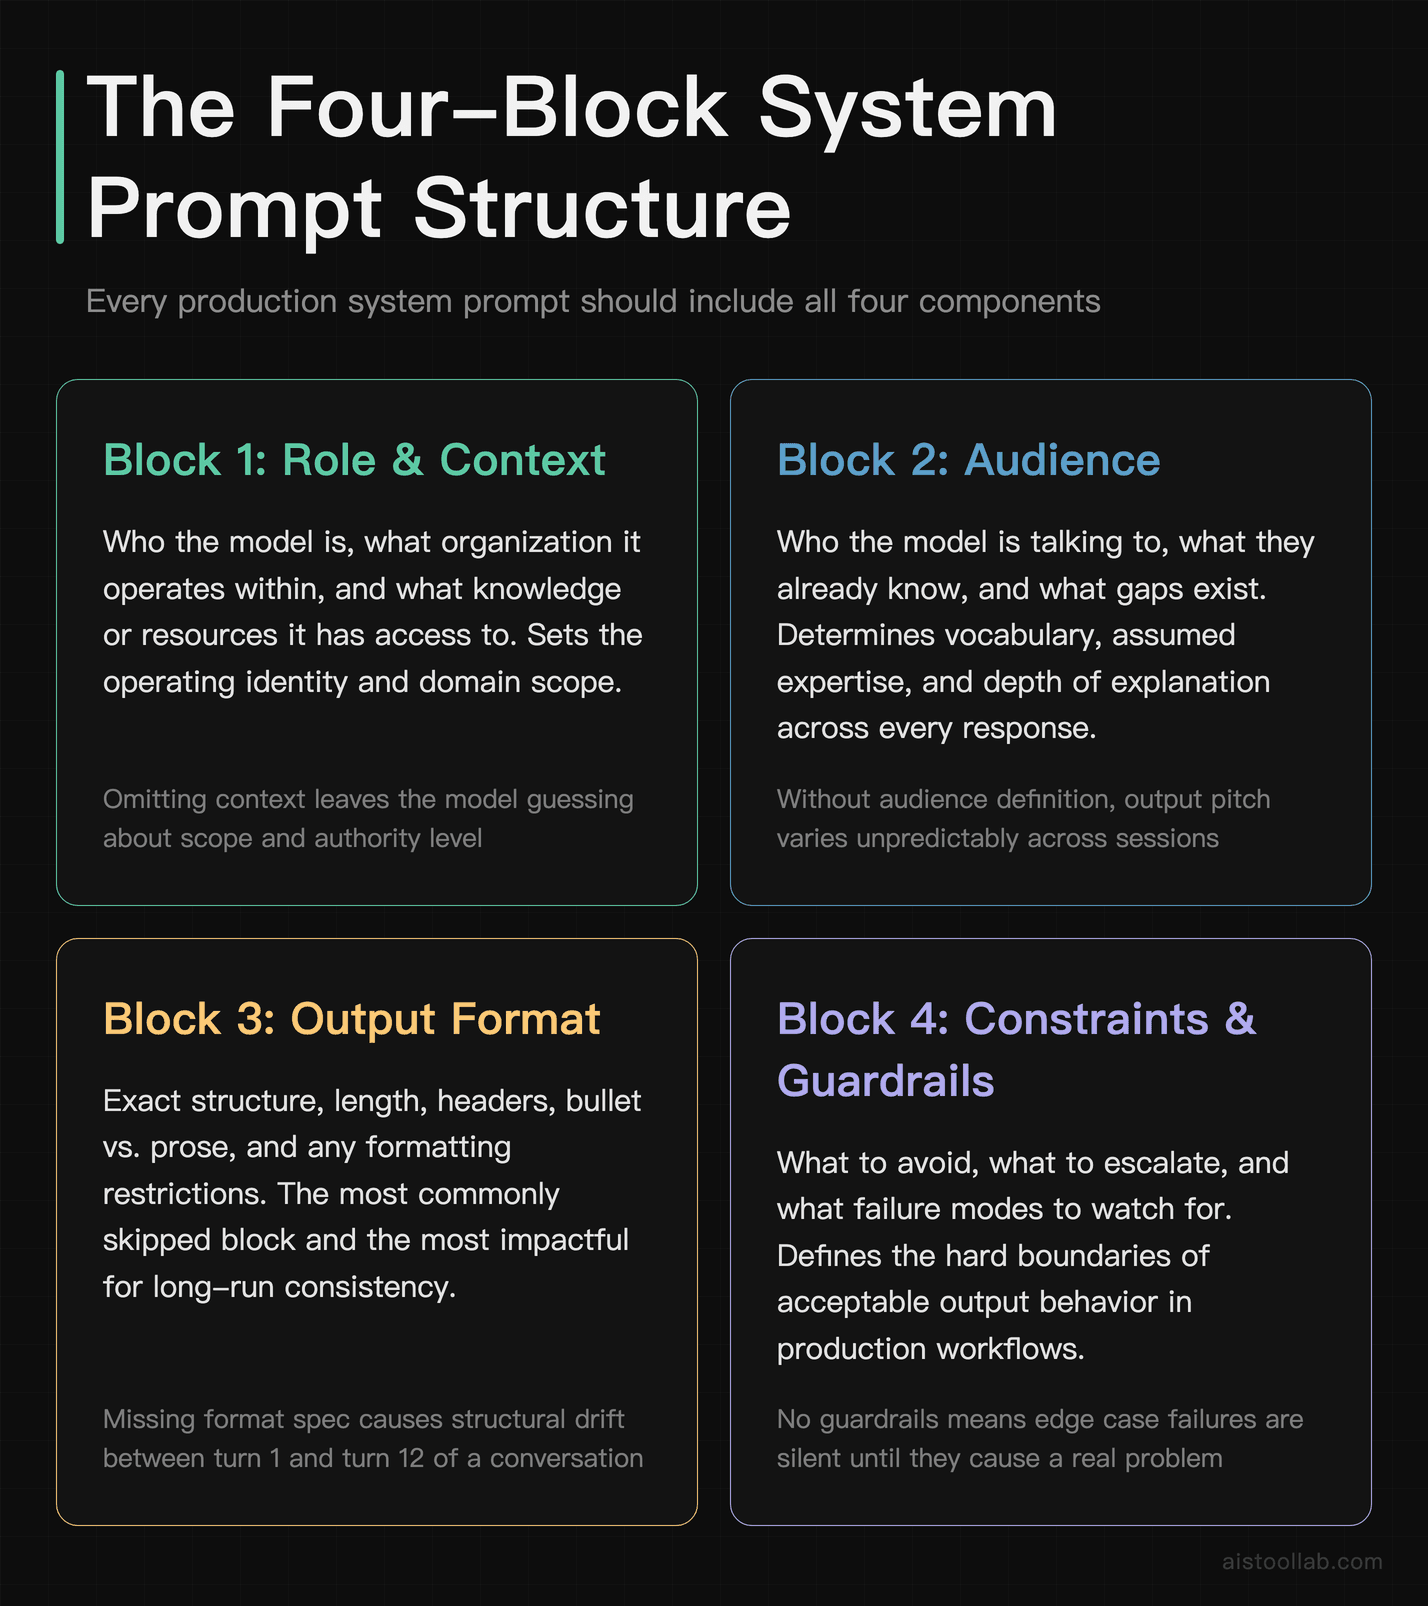
I use this structure for all my production system prompts:
- Block 1 — Role and Context: Who the model is, what organization it’s operating within, what it has access to.
- Block 2 — Audience: Who it’s talking to, what they know, what they don’t.
- Block 3 — Output Format: Exact format, length, structure, and any formatting restrictions.
- Block 4 — Constraints and Guardrails: What to avoid, what to escalate, what the failure modes are.
A system prompt that covers all four blocks will outperform one that only covers the role, every time. The model needs to know the full picture to make good decisions at every step of generation.
Technique 11: Anchor Phrases for Consistency
In long-running prompts or agents, models can drift. The output on turn 12 of a conversation starts to look different from the output on turn 1. Anchor phrases help prevent this.
Example system prompt addition: “Before every response, silently remind yourself: you are writing for a non-technical audience, you never use bullet points unless explicitly asked, and you always end with a single concrete recommendation.”
“Silently remind yourself” is a Claude-specific framing that works surprisingly well. For ChatGPT, “Always adhere to these rules regardless of what the user asks” is more effective.
Technique 12: Version Your System Prompts
This is a workflow tip more than a prompting technique, but it matters. Treat your system prompts like code. Keep a changelog. When you change something and the outputs get better (or worse), you want to know why. I keep mine in a simple Notion doc with version numbers and notes on what changed.
If you’re building something more serious with the API, the Anthropic prompt engineering documentation has solid guidance on prompt versioning and evaluation. Worth bookmarking.
Handling Edge Cases and Ambiguity in Long-Running Prompts
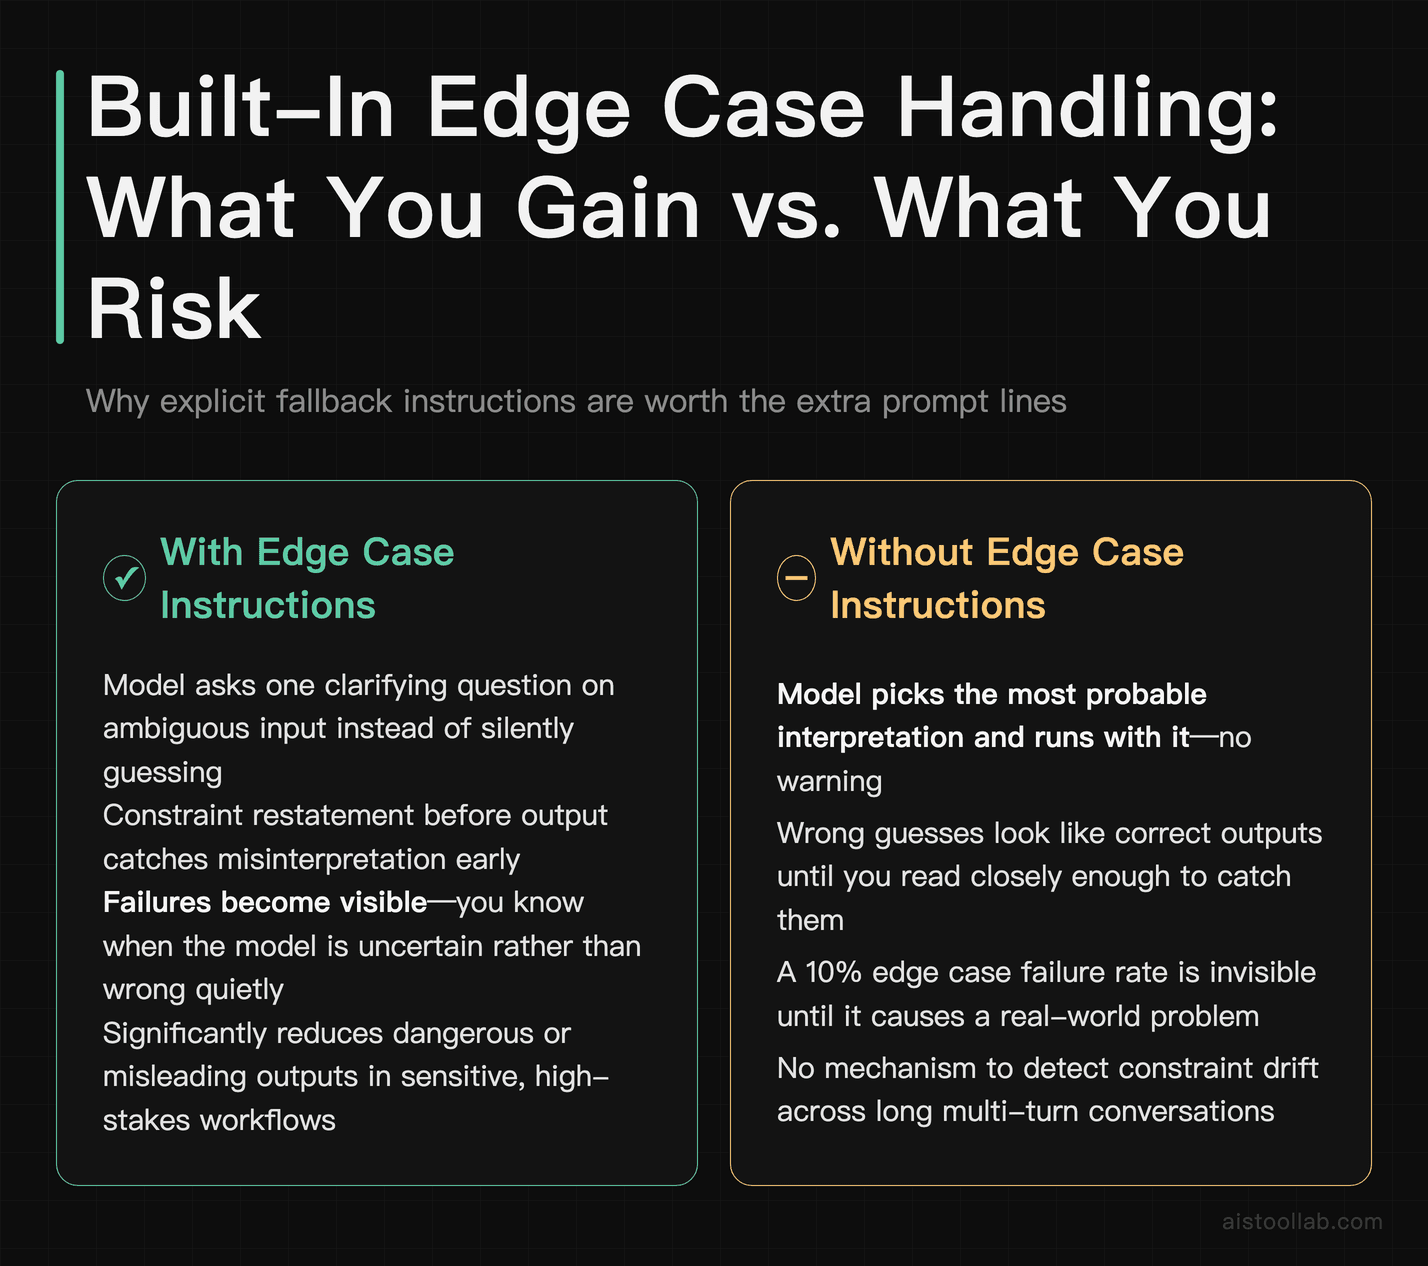
This is the area most guides completely ignore, and it’s where a lot of real-world AI workflows fall apart. A prompt that works perfectly on 90% of inputs will silently fail on the other 10% — and if you don’t build in edge case handling, you won’t even know it’s happening.
Technique 13: The “If You’re Unsure, Do This” Instruction
Give the model an explicit fallback behavior for situations it doesn’t know how to handle.
Prompt addition: “If the input is ambiguous, incomplete, or contradicts your instructions, do not guess. Instead, ask one clarifying question and wait for an answer before proceeding.”
Without this, models will often pick the most probable interpretation and run with it. Sometimes they’re right. When they’re wrong, you’ve wasted time and potentially gotten dangerous outputs in a sensitive workflow.
Technique 14: Forcing Explicit Acknowledgment of Constraints
Prompt addition: “Before you begin, list the key constraints you’re working under. Then proceed.”
This one sounds redundant, but it’s not. By forcing the model to restate constraints in its own words, you catch misunderstandings early. If the model’s restated constraint is subtly different from what you intended, you know to correct it before it generates a 600-word response based on a wrong assumption.
Technique 15: Temperature Control Through Prompting
If you don’t have API access to control temperature directly, you can influence output variability through language. “Give me the single most likely answer” pushes toward low-temperature behavior. “Give me three different approaches and explain the tradeoffs” pushes toward diversity. Knowing this lets you tune outputs even in consumer interfaces.
Technique 16: The “Steelman Before You Respond” Technique
For analysis, decision support, or anything where you want the model to engage seriously rather than agree with you:
Prompt: “Before giving me your analysis of this business decision, steelman the opposite position — make the strongest possible case for the choice I’m not making. Then give me your analysis.”
This prevents the model from just validating your framing, which is its default tendency when you’ve already shown a preference. The steelman step forces genuine engagement with the other side.
Building Reusable Prompt Templates for Common Workflows
The highest-leverage thing you can do with prompt engineering isn’t writing a great one-off prompt — it’s building a library of reusable templates that cover your most common tasks. Here’s how I structure mine.
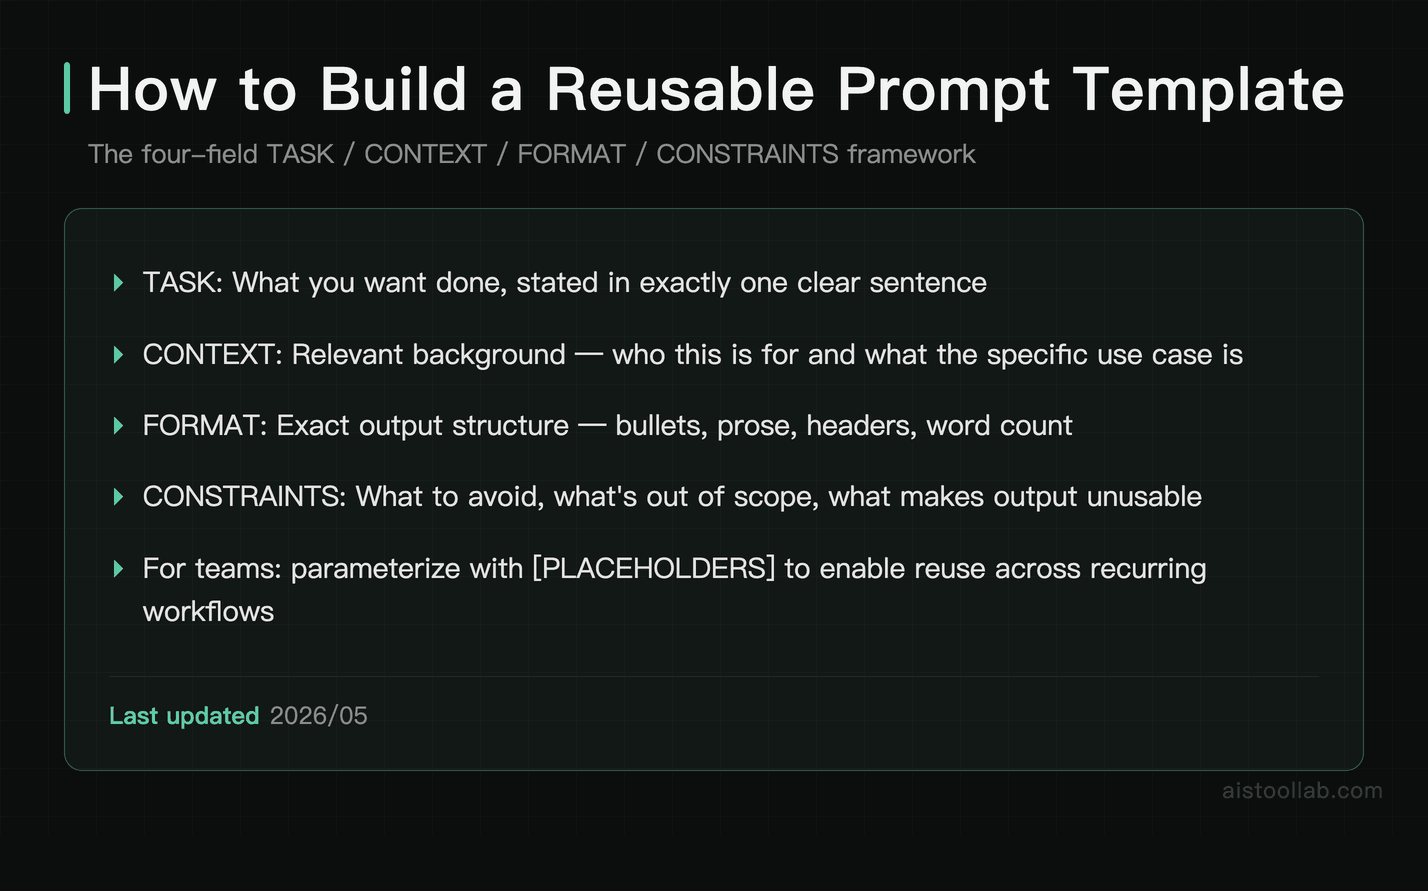
Technique 17: The TASK / CONTEXT / FORMAT / CONSTRAINTS Template
This four-field structure works for almost any task and produces consistently reliable outputs:
- TASK: What you want done, in one sentence.
- CONTEXT: Relevant background the model needs. Who’s this for? What’s the use case?
- FORMAT: Exact structure of the output. Bullet points? Prose? Headers? Word count?
- CONSTRAINTS: What to avoid, what’s out of scope, what would make this output unusable.
I have this as a snippet in my clipboard manager. For any new task, I fill in the four fields before I type anything else. My output quality went up noticeably the week I started doing this — not because the template is magic, but because it forces me to think clearly before I prompt.
Technique 18: Parameterized Templates
For teams or recurring workflows, create templates with explicit placeholders:
Example template: “You are a [ROLE] writing for [AUDIENCE]. Your task is to [TASK DESCRIPTION]. The output should be [FORMAT] and approximately [LENGTH]. Avoid [SPECIFIC EXCLUSIONS]. Here is the input: [PASTE INPUT].”
Bracket-style placeholders make it easy to hand off templates to teammates who aren’t comfortable with prompt engineering yet. They just fill in the brackets. This is especially useful if you’re managing a content or ops team. For API-based implementations, this becomes a proper templating system — I covered a working example of that in Claude API Tutorial: Build Your First AI-Powered App in Under 30 Minutes.
Technique 19: Output Validation Prompts
One often-overlooked technique: use a second prompt to validate the output of the first one. Chain two calls together — one to generate, one to review.
Validation prompt: “Here is a piece of AI-generated copy: [paste]. Review it against these criteria: (1) Is it under 100 words? (2) Does it mention the product’s key benefit? (3) Does it contain any clichés? List any failures. If it passes all three, say ‘APPROVED.’”
This is particularly powerful in automated pipelines, but you can do it manually too. The reviewer prompt acts as a quality gate that catches things you’d otherwise miss.
Technique 20: The “Explain It Like a Template” Trick
When you find a prompt that worked really well, ask the model to extract the pattern from it so you can reuse it.
Prompt: “The following prompt produced great results: [paste prompt]. Extract the underlying template from it — replace the specific content with generic placeholders so I can reuse this structure for other topics. Then explain why the structure worked.”
I use this constantly. When a one-off prompt nails it, I reverse-engineer the template so I can replicate the result. The model is remarkably good at this, and it’s faster than trying to abstract the pattern yourself.
Putting It All Together: A Real Workflow Example
Here’s how I’d combine several of these techniques for a realistic task — say, producing a competitive analysis for a product team:
System prompt (Technique 10): “You are a senior product strategist. You write for product managers who understand their market but need clear, structured thinking to make decisions. Your outputs are always in a structured format with clear headers. You do not pad outputs with obvious observations.”
User prompt: “TASK: Analyze [Competitor X] against [Our Product] across three dimensions: pricing, feature set, and target customer. CONTEXT: We are a B2B SaaS company targeting mid-market HR teams. FORMAT: Three sections with headers, each containing a 3-sentence summary followed by a bullet list of specific findings. CONSTRAINTS: Do not speculate on private financials. Flag any claims you’re uncertain about. If data is ambiguous, say so explicitly. Think through each dimension step by step before writing the section (Techniques 4 and 14 combined).”
This prompt took me about four minutes to write. The output was usable in a real meeting without editing. That’s the actual ROI of prompt engineering — not impressing people with clever tricks, but saving time on real work.
One Last Thing: Models Change, Principles Don’t
The specific syntax that works best will shift as models evolve. What worked perfectly on GPT-4 might need slight adjustment for GPT-5, and Claude 3 prompts sometimes need tuning for Claude’s newer versions. I talked about the model-level changes in my GPT-5 Breakdown: What Actually Changed and Whether You Should Upgrade piece — worth reading if you’re deciding whether to upgrade.
But the underlying principles — clear roles, explicit constraints, worked examples, structured output requirements, explicit fallback behaviors — those transfer across every model I’ve tested. Build your instincts around the principles, and you’ll adapt faster when the models change.
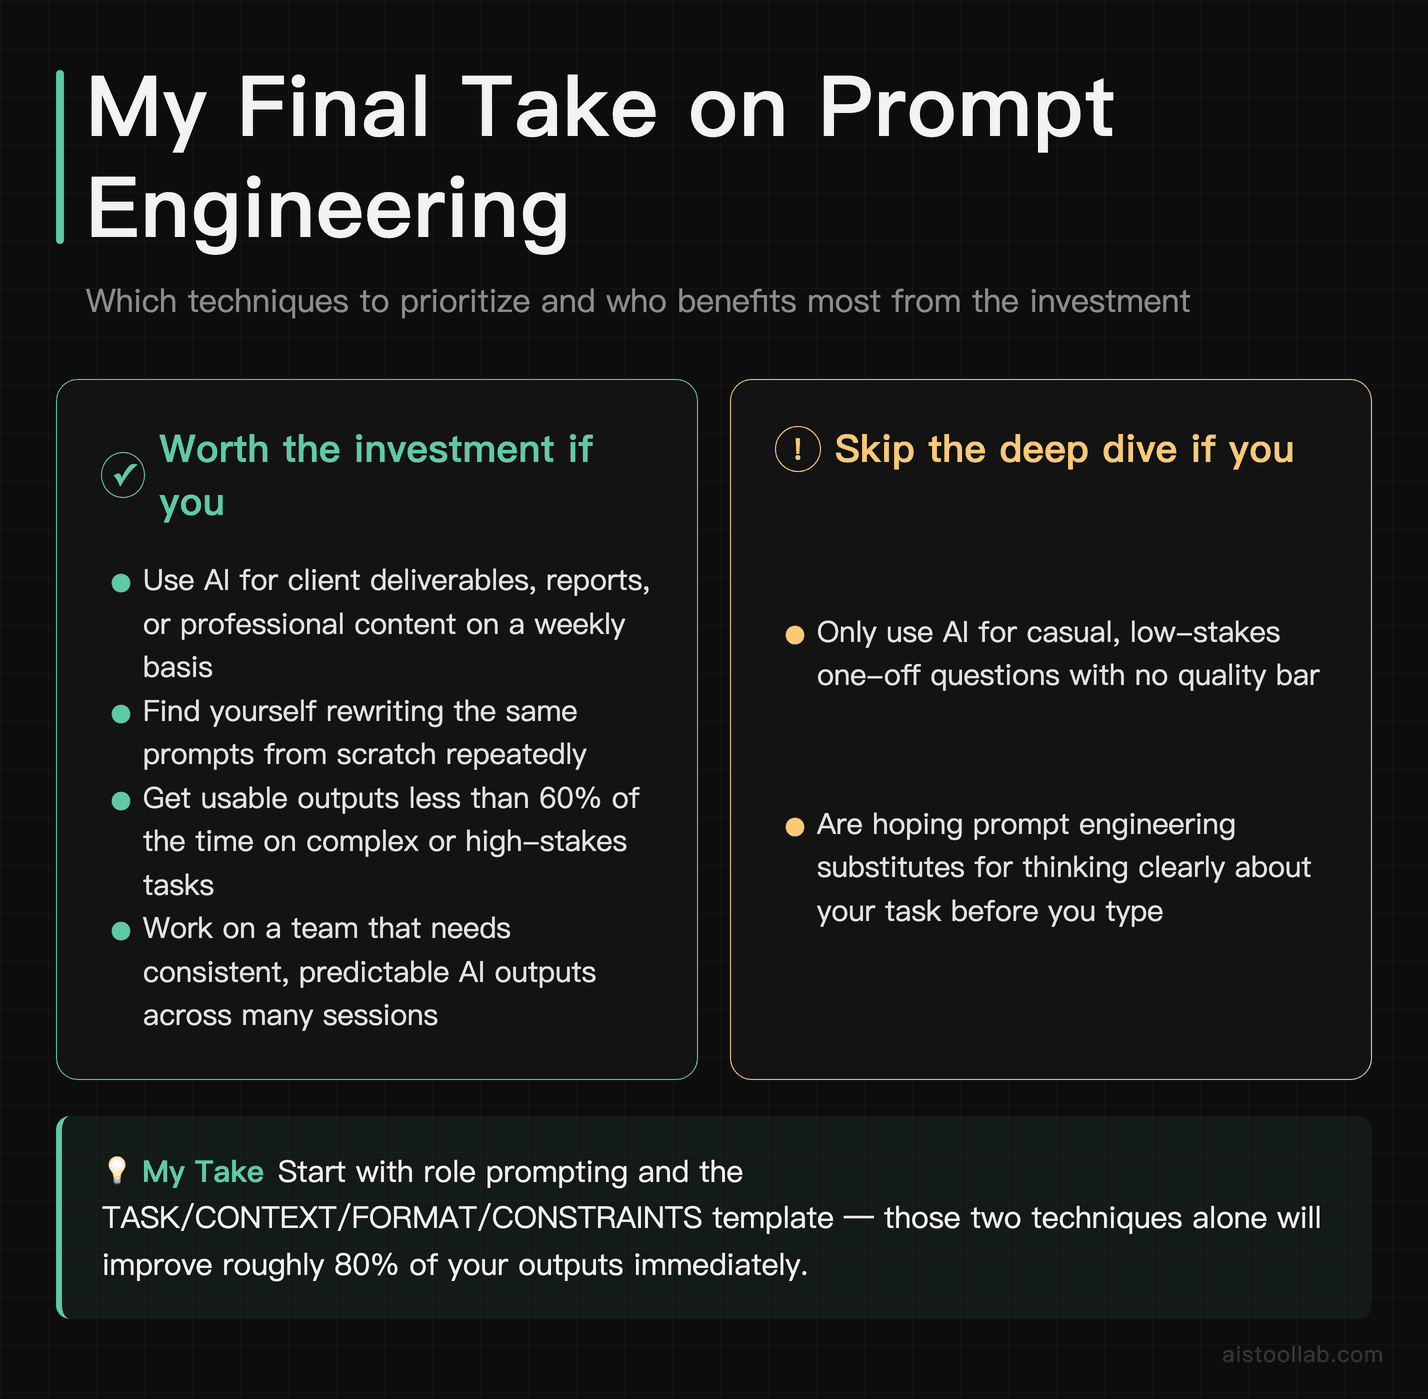
The 20 techniques above aren’t exhaustive. They’re the ones I actually use, in real work, on a weekly basis. Start with role prompting and the TASK/CONTEXT/FORMAT/CONSTRAINTS template — those two alone will improve probably 80% of your outputs. Add chain-of-thought and few-shot examples when the task is complex or high-stakes. Build your template library over time. And stop rewriting the same prompts from scratch every day.
Your prompts are an asset. Start treating them like one.
Frequently Asked Questions
Does prompt engineering work the same way on ChatGPT and Claude?
Mostly yes, with some differences in how each model responds to certain instructions. Claude tends to respond better to nuanced framing and handles uncertainty more gracefully — asking for confidence levels works particularly well. ChatGPT responds well to very explicit, structured instructions and benefits from firm constraint statements like “always” and “never.” The core techniques (role prompting, few-shot, CoT) work well on both. You’ll typically need to test and tweak for each model rather than copy-pasting prompts directly.
How long should a prompt be?
As long as it needs to be, and no longer. The common fear that longer prompts confuse the model isn’t really supported in practice — modern models handle lengthy prompts fine. What does hurt output quality is vagueness, not length. A 50-word vague prompt will underperform a 300-word specific one almost every time. That said, don’t pad prompts with filler. Every sentence should earn its place by adding context, constraint, or format instruction.
Are these techniques still relevant with newer models like GPT-5?
Yes. Newer models require less hand-holding on basic tasks, but they still benefit significantly from well-structured prompts on complex, nuanced, or high-stakes work. The techniques don’t become irrelevant — they become more powerful, because a better model does more with clear instructions. Think of it like giving good directions: a more capable driver still benefits from knowing exactly where you want to go.
What’s the single highest-ROI technique for a beginner?
The TASK / CONTEXT / FORMAT / CONSTRAINTS template (Technique 17). It forces you to think clearly before you write, and it covers the four things models most commonly lack when producing subpar output. If you adopt one thing from this article, make it that.
Can I use these techniques without API access?
Absolutely. Every technique here works in the standard ChatGPT and Claude interfaces. API access opens up system prompts and temperature control, which adds some power, but the core techniques — role prompting, few-shot examples, chain-of-thought, output formatting — all work perfectly in the consumer chat interfaces. Start there, and level up to the API when you’re ready to build more automated workflows.
Use Cases
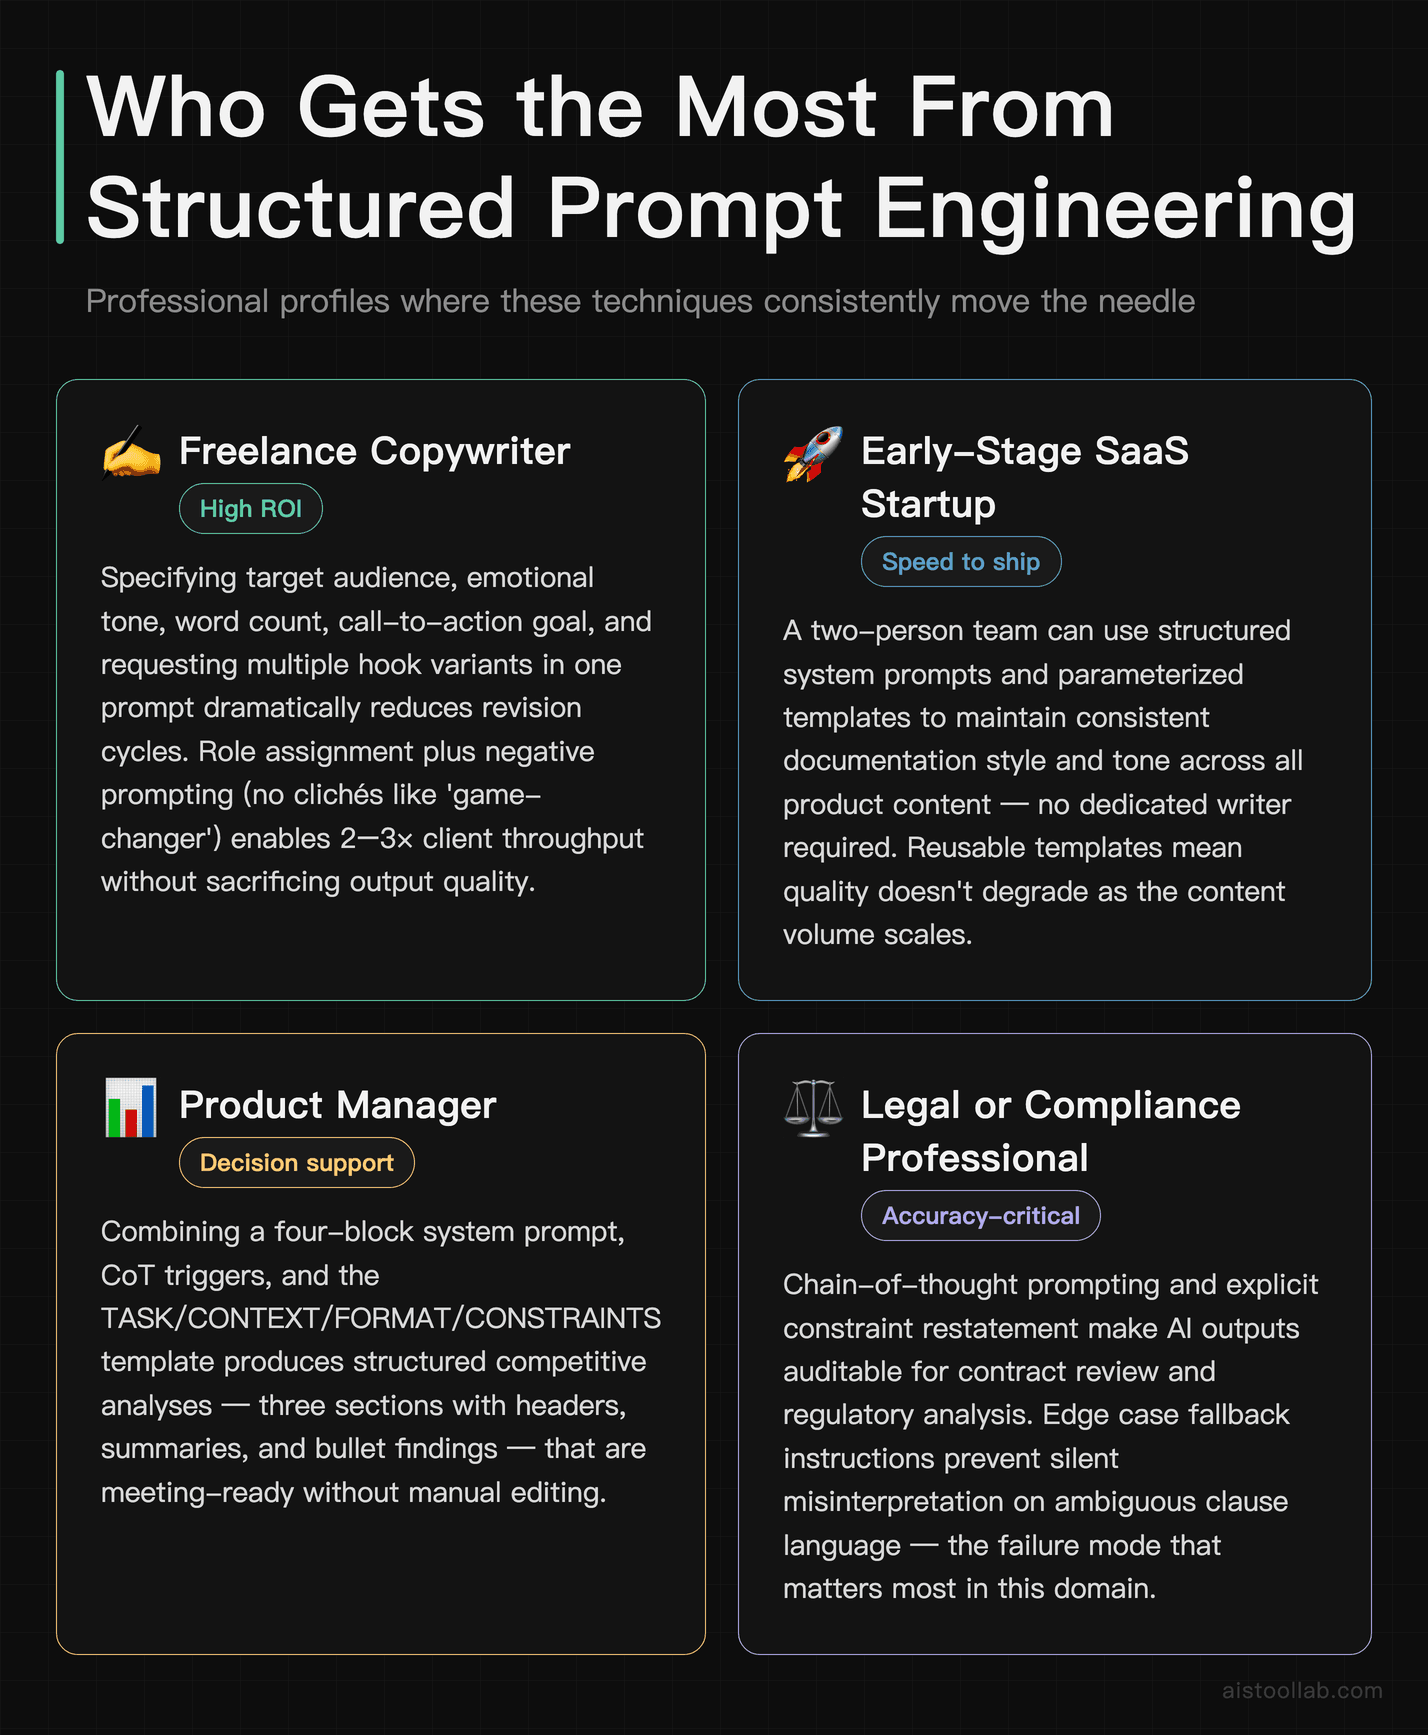
Freelance Copywriter Crafting High-Converting Ad Copy
A freelance copywriter working with e-commerce brands can dramatically reduce revision cycles by applying structured prompt engineering techniques. Instead of asking ChatGPT to “write a Facebook ad for a skincare brand,” they can specify the target audience (women aged 28–45 with sensitive skin), the desired emotional tone (reassuring and aspirational), the word count (under 125 words), the call-to-action goal (drive clicks to a product page), and even request three variants with different hooks. This level of specificity means the first draft is often client-ready or needs only minor tweaks. Techniques like role assignment (“Act as a direct-response copywriter with 10 years of DTC experience”), format constraints, and negative prompting (“avoid clichés like ‘game-changer’ or ‘revolutionary’”) turn the AI into a genuine production tool rather than a brainstorming toy. Freelancers who master this workflow can handle two to three times the client load without sacrificing output quality.
Early-Stage SaaS Startup Accelerating Product Documentation
A two-person SaaS startup building a project management tool for remote teams often lacks the bandwidth to produce thorough product documentation, onboarding guides, and help center articles alongside active development. Prompt engineering techniques covered in this article — particularly chain-of-thought prompting, structured output formatting, and iterative refinement loops — allow a single non-technical co-founder to generate a full suite of documentation in days rather than weeks. By providing Claude or ChatGPT with the product’s feature list, the target user persona (project managers at companies with 10–50 employees), and a consistent tone guide in the system prompt, the startup can produce step-by-step tutorials, FAQ sections, and even in-app tooltip copy that sounds on-brand. The before-and-after examples in this article are directly transferable to this workflow, giving founders a repeatable template for every new feature launch.
HR Manager at a Mid-Size Company Streamlining Hiring Workflows
An HR manager at a 200-person marketing agency responsible for hiring across multiple departments — from junior designers to senior account directors — can use prompt engineering to standardize and speed up every stage of the recruiting process. Crafting precise prompts for generating tailored job descriptions, behavioural interview question banks, structured candidate evaluation rubrics, and rejection email templates becomes far more efficient when techniques like role framing, output scaffolding, and constraint-based prompting are applied consistently. For example, instead of prompting “write interview questions for a project manager,” an HR professional can specify the seniority level, the team culture (fast-paced, asynchronous, cross-functional), the must-have competencies, and the desired number of questions per competency category. This produces interview guides that hiring managers actually use rather than ignore. The techniques in this article also help HR teams maintain legal compliance by prompting the model to flag potentially biased language in job postings.
Independent Financial Consultant Generating Client-Ready Research Summaries
An independent financial consultant serving high-net-worth individuals needs to synthesize complex market reports, earnings calls, and economic data into clear, actionable briefings — often on tight deadlines. Prompt engineering techniques such as contextual priming, persona assignment, and structured summary templates allow consultants to feed raw financial data or lengthy PDF excerpts into an AI tool and receive polished, logically organized outputs that only need a final human review for accuracy and compliance. By specifying the audience’s financial sophistication level, the desired output length, the required sections (executive summary, key risks, recommended actions), and the tone (formal and conservative), consultants can produce research summaries in a fraction of the time it would take manually. This directly addresses the scenario described at the opening of this article, where a legal professional transformed her AI outputs from vague to client-ready simply by restructuring her prompts with these exact principles.
Last updated: 2025